
Hidemyacc is an anti-detect browser designed to help users create and manage separate browser profiles. Each profile can have its own browser fingerprint, cookies, local storage, time zone, language, and other environment settings.
However, browser fingerprints are only one part of a clean browsing environment. The IP address matters just as much.
If multiple Hidemyacc profiles are using the same local IP address, websites may still be able to connect those sessions through network signals. That is why many users pair Hidemyacc with proxies. A proxy gives each browser profile a separate network identity, while Hidemyacc handles the browser-side identity.
In this guide, you will learn how to configure IPWeb proxies in Hidemyacc, create a browser profile, adjust profile settings, add proxy details, check the proxy connection, and verify the final IP address inside the launched browser.
Before You Start
Before adding a proxy to Hidemyacc, make sure you have the following proxy details from IPWeb:
- Proxy host
- Port
- Username
- Password
- Proxy protocol, such as HTTP(S) or SOCKS5
- Target country or region
A typical proxy format looks like this:
Host:Port:Username:PasswordFor example:
gate1.ipweb.cc:7778:your_username:your_passwordThe exact host, port, username, and password should be copied from your IPWeb dashboard. If you generated a proxy for a specific country, city, or session type, make sure you use the same proxy information when adding it to Hidemyacc.
Why Use IPWeb Proxies with Hidemyacc?
Hidemyacc helps separate browser environments. IPWeb proxies help separate network environments.
When used together, they allow each browser profile to appear more consistent and independent. This is useful for workflows where users need different profiles to operate from different IP addresses, regions, or network sessions.
For example, a profile using a US-based proxy should ideally also use matching browser settings, such as a US time zone and appropriate language settings. This creates a more natural environment than using a US IP address with unrelated local settings.
A good setup is not just about changing the IP. It is about making the whole browser environment look consistent.
Which Proxy Type Should You Choose?
IPWeb supports different proxy use cases, and the right choice depends on what you want to do inside Hidemyacc.
For regular browser browsing, account login, dashboard access, and platform management, HTTP(S) proxies are usually simple and compatible.
For users who need broader protocol support or prefer SOCKS-based connections, SOCKS5 proxies are also a good option.
For long-term account management, a stable proxy is usually better than frequently changing IP addresses. If an account always logs in from a similar region and network type, the activity looks more consistent.
For short-term testing, regional checks, scraping tests, or temporary browsing sessions, rotating residential proxies can be more flexible.
| Use Case | Recommended Proxy Type |
|---|---|
| Long-term account management | Static or long-session residential proxy |
| Regional website testing | Residential proxy from the target country |
| Short browsing sessions | Rotating residential proxy |
| Higher compatibility needs | SOCKS5 proxy |
| General web access | HTTP(S) proxy |
If you are managing important accounts, avoid changing IP locations too often. A stable network history is usually better than constantly rotating between countries.
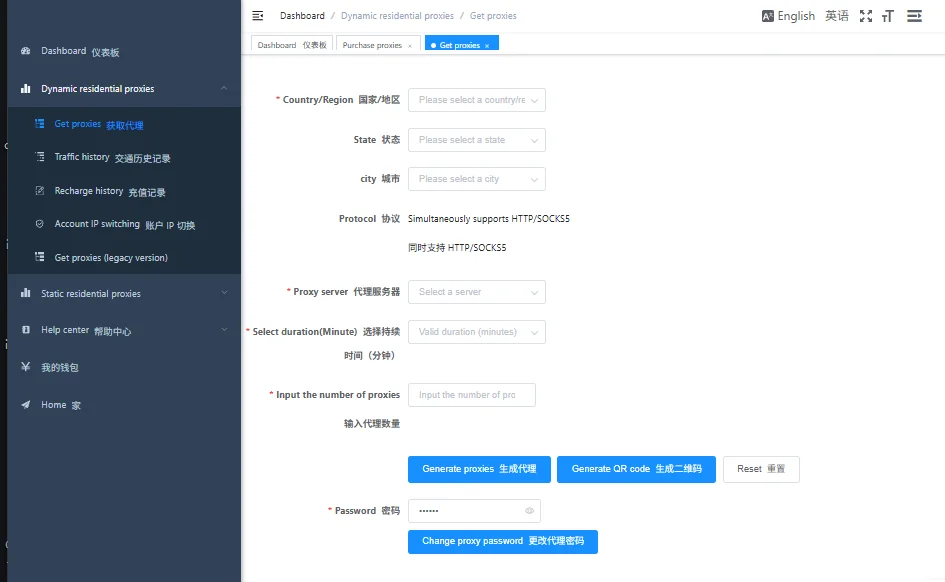
Step 1: Generate or Copy Your Proxy from IPWeb
Log in to your IPWeb dashboard and generate the proxy you want to use.
When generating the proxy, pay attention to:
- Country or region
- Protocol type
- Session duration
- Authentication method
- Proxy host and port
After the proxy is generated, copy the full proxy information. Hidemyacc commonly uses this format:
Host:Port:Username:PasswordMake sure there are no extra spaces, line breaks, or unsupported characters. A small formatting mistake can cause the proxy test to fail.
Step 2: Create a New Hidemyacc Profile
Open Hidemyacc and go to the Profiles page. If you have not created any profiles yet, click Create a new profile.
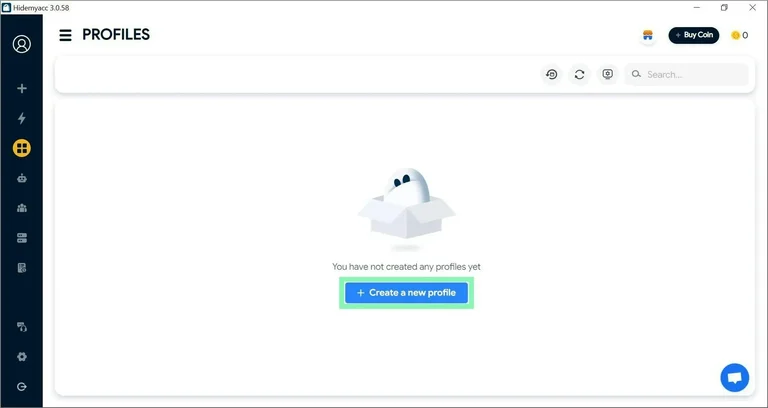
Give the profile a clear name. In this example, the profile name is IPWeb, but you can use any name that helps you identify the profile later.
Step 3: Adjust Advanced Browser Settings Before Adding Proxy
Before adding the proxy, you can review the advanced browser settings in Hidemyacc. These settings help define the browser-side environment of the profile, including language, screen resolution, hardware concurrency, device memory, canvas, WebGL, and other fingerprint-related signals.
For example, if you plan to use a US proxy, it is usually better to keep the browser language, time zone, and device settings consistent with a normal US browsing environment. This makes the profile more coherent before you connect it to an IPWeb proxy.
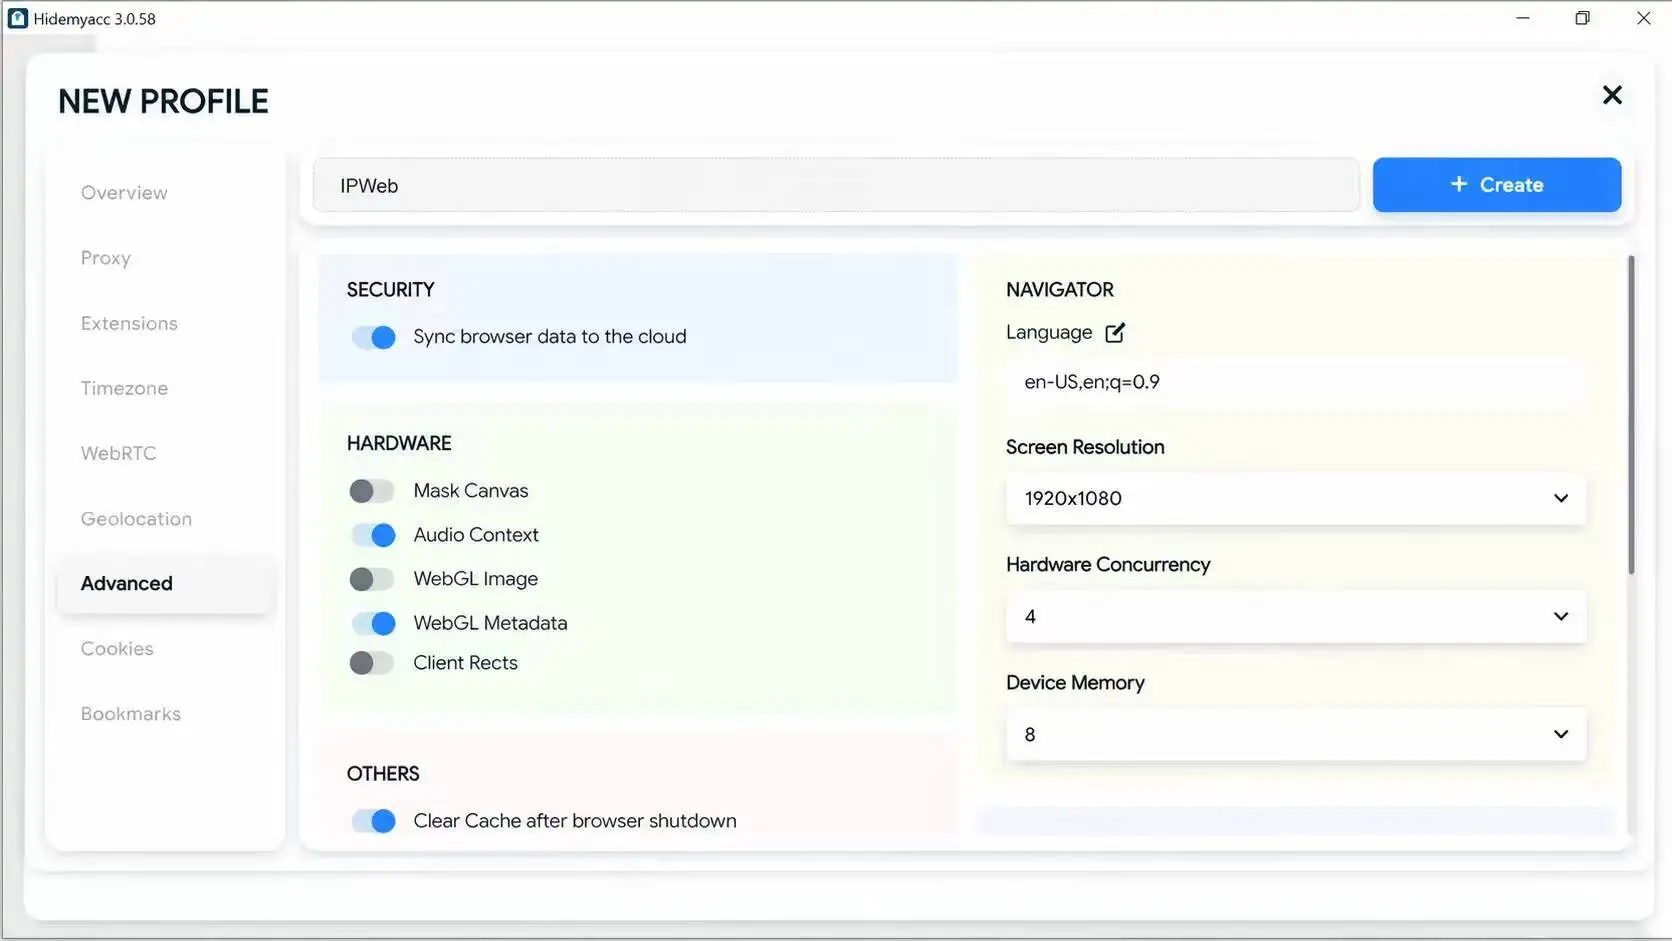
You do not need to change every advanced setting manually. The key point is to avoid obvious mismatches between the proxy location and the browser environment.
Step 4: Add the IPWeb Proxy to the Profile
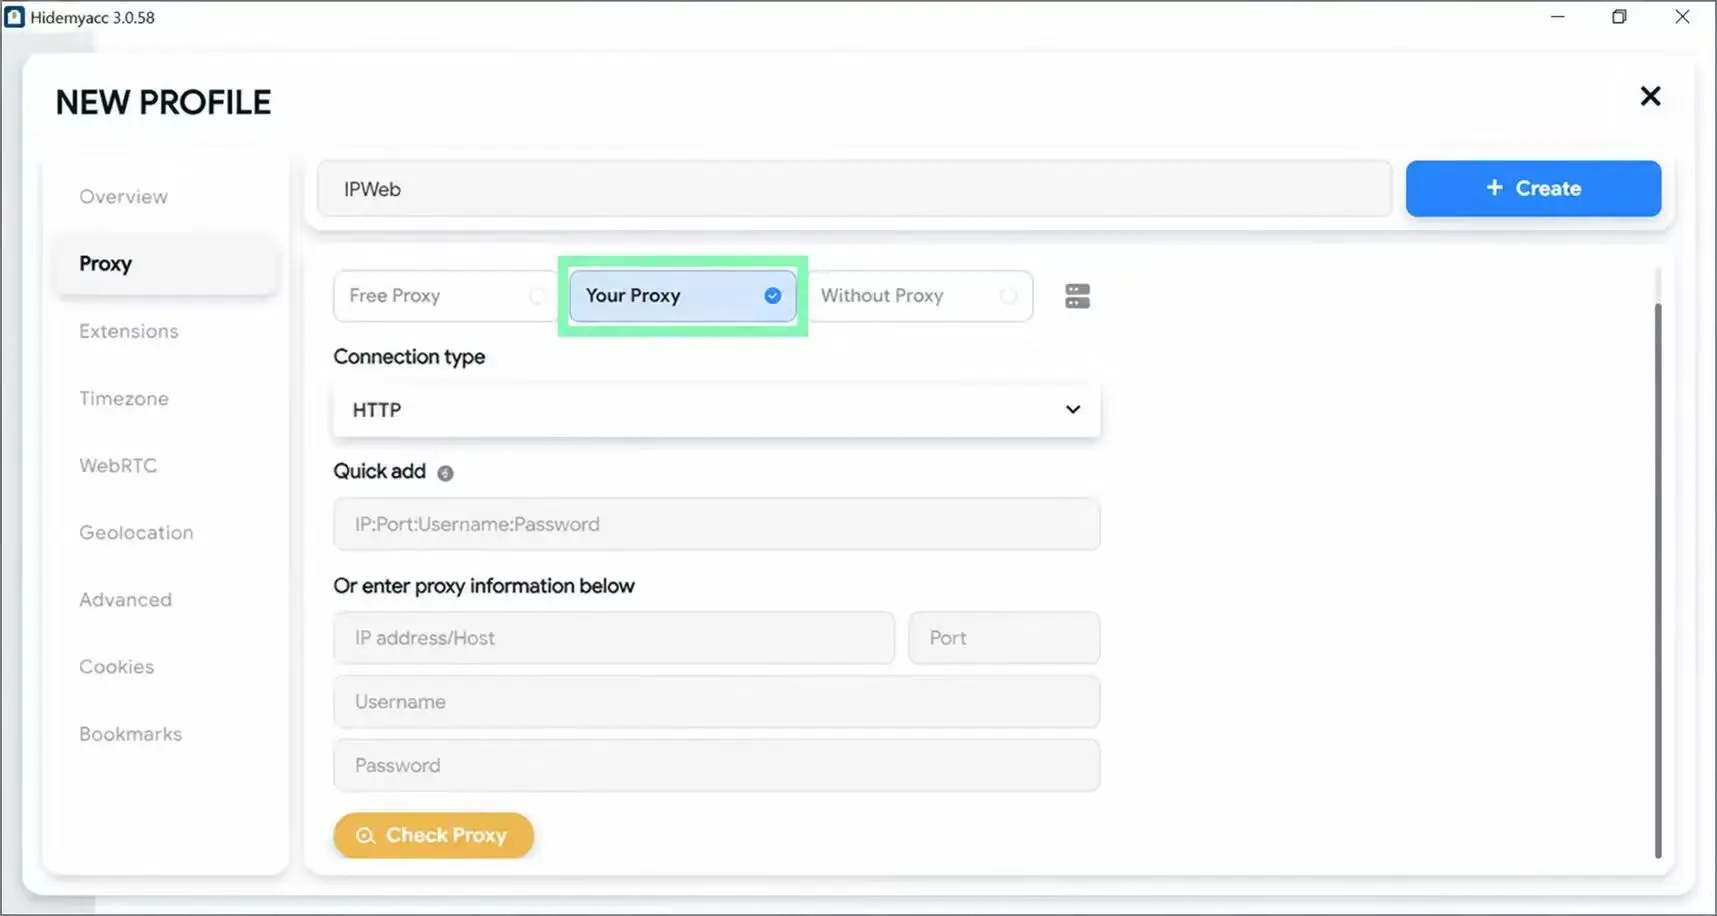
Go to the Proxy section from the left-side menu. In the Proxy section, choose Your Proxy. Then select the correct connection type, such as HTTP or SOCKS5.
Your selected connection type must match the proxy protocol from IPWeb. If your proxy is HTTP, select HTTP. If your proxy is SOCKS5, select SOCKS5.
You can use the Quick add field to paste the full IPWeb proxy string directly:
gate1.ipweb.cc:7778:Username:PasswordHidemyacc will separate the host, port, username, and password into the fields below.
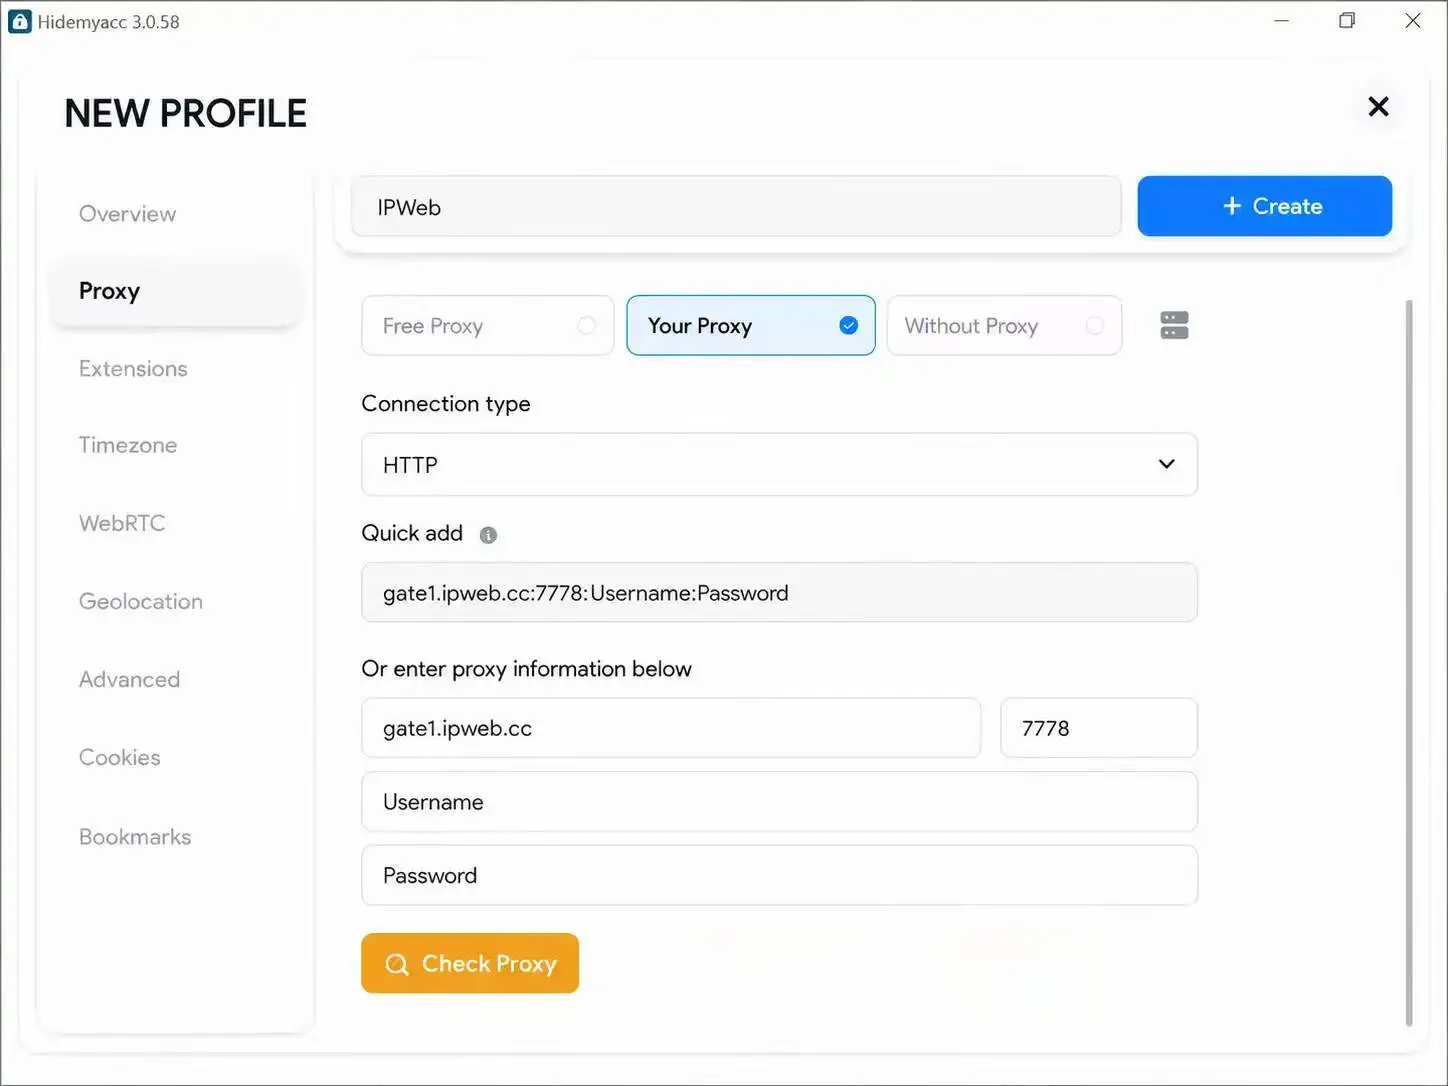
If you prefer to enter the proxy manually, fill in the fields like this:
- Host: gate1.ipweb.cc
- Port: 7778
- Username: Your IPWeb username
- Password: Your IPWeb password
After entering the proxy details, click Check Proxy. If the proxy is working, Hidemyacc should return a successful result with the IP address and location.
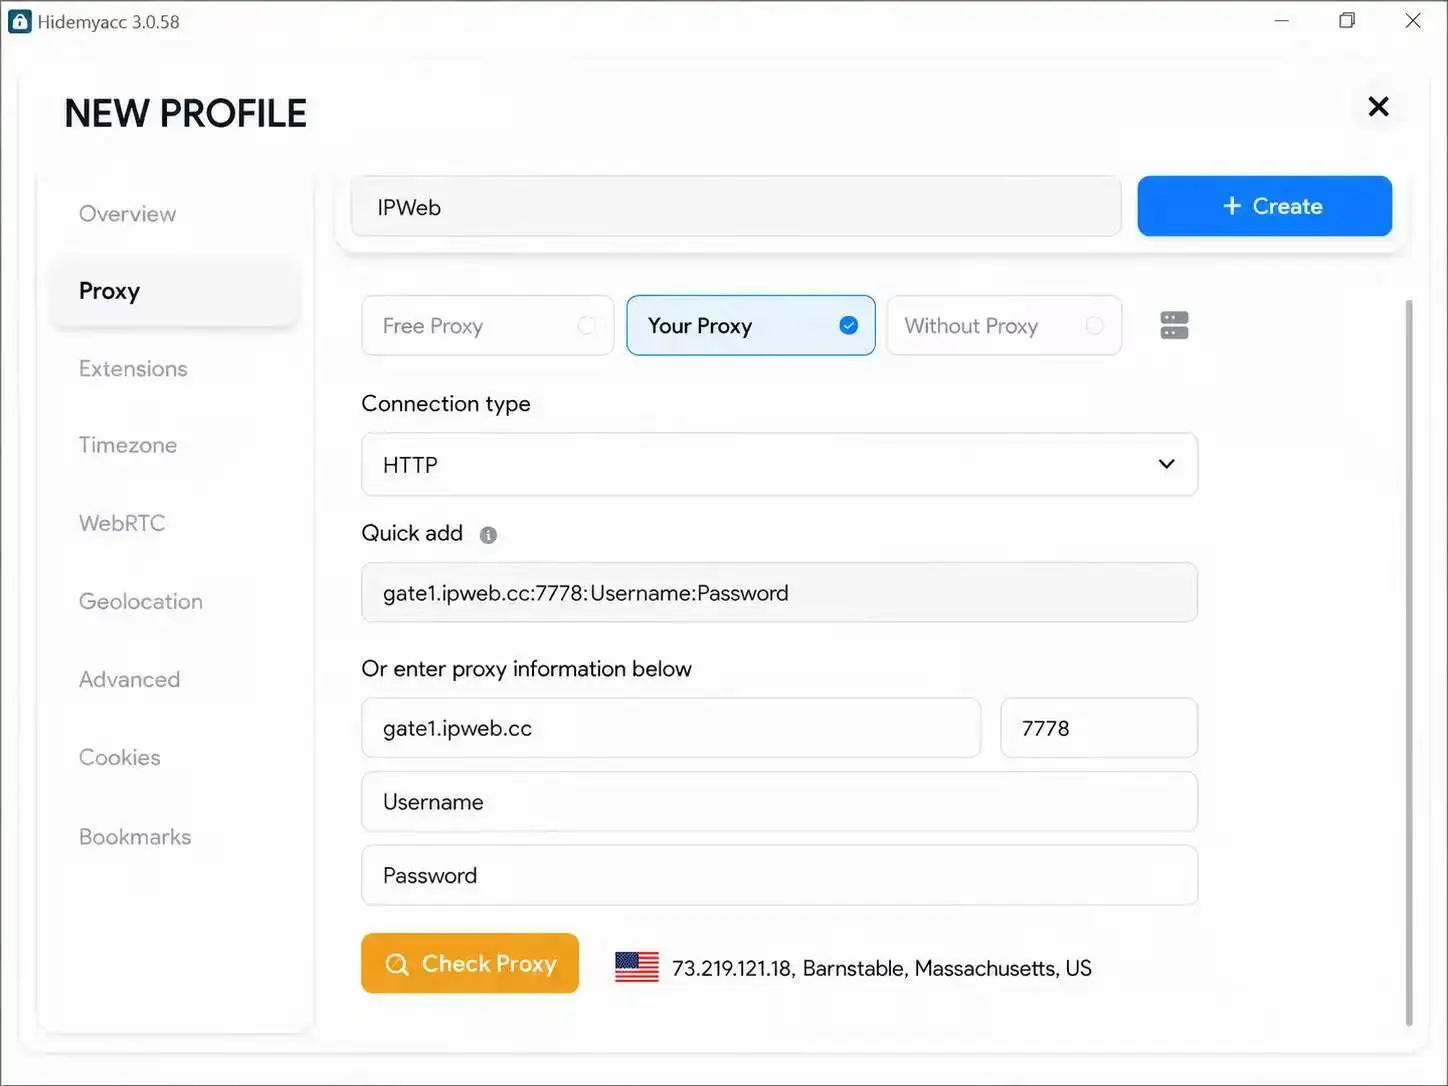
In this example, the proxy check shows a US IP address with the location Barnstable, Massachusetts, US. This confirms that the proxy is connected successfully inside Hidemyacc.
Step 5: Manage the Proxy in Hidemyacc Proxy Manager
Hidemyacc also includes a Proxy Manager feature that lets you save and manage proxies in one place. This is useful if you plan to use multiple browser profiles or organize proxies by region, project, or account group.
After adding and checking your proxy, you can view it in Proxy Manager. A working proxy should show a Ready status, along with its proxy type, proxy host, location, and tag.
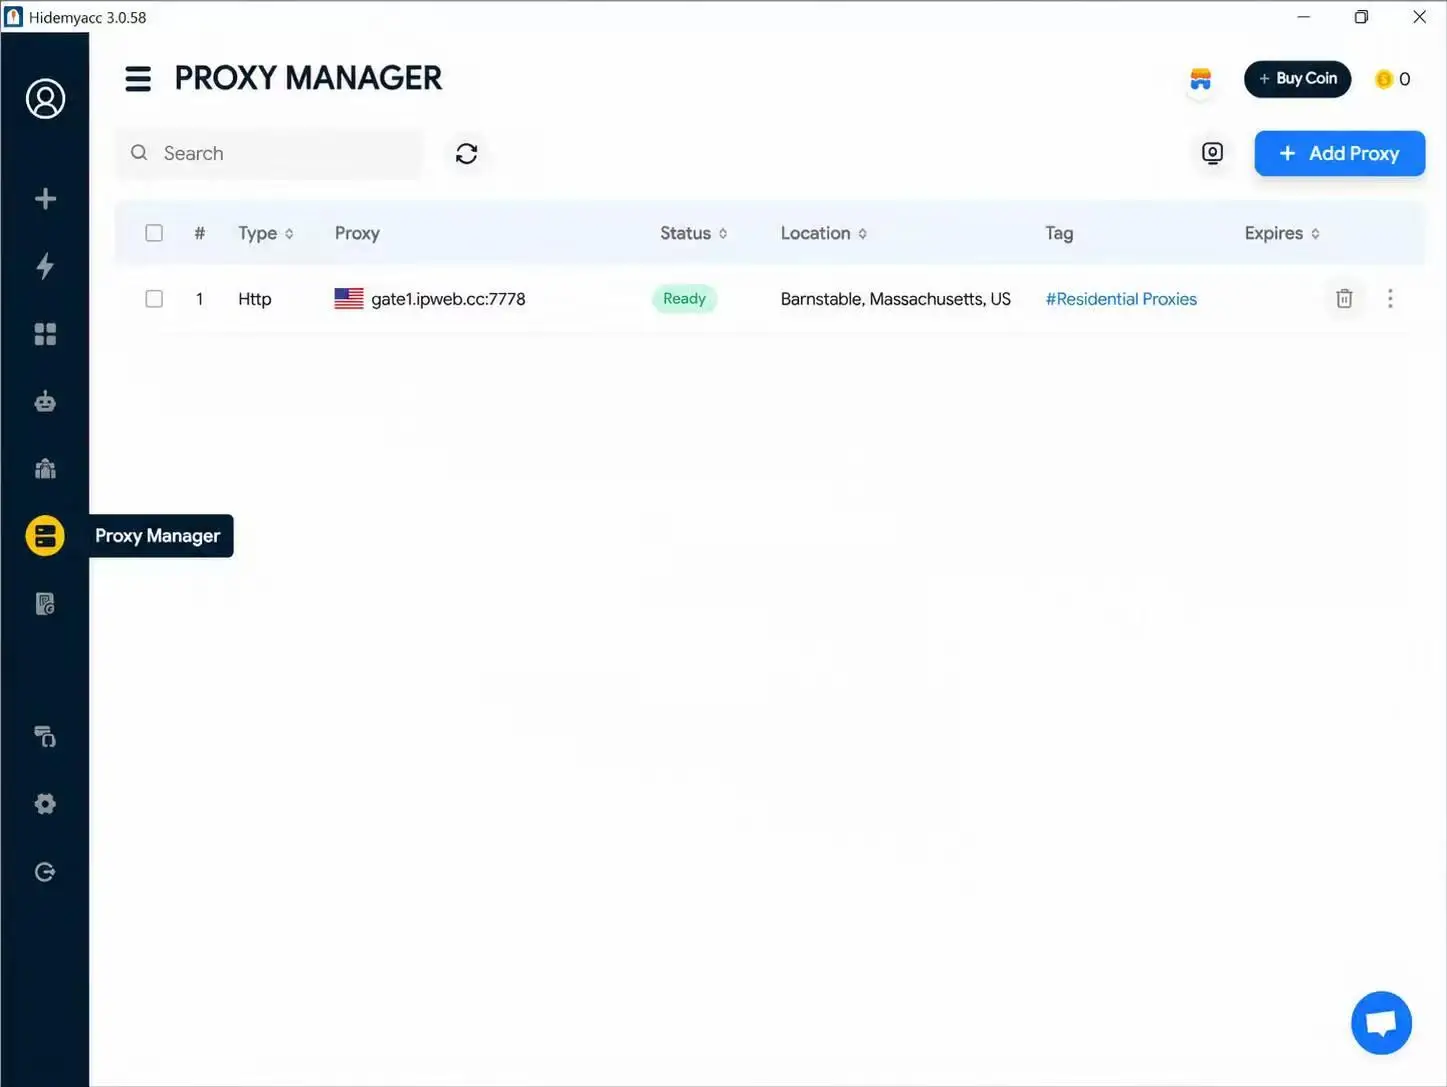
For easier management, you can use tags such as:
#Residential Proxies
US-social
US-ecommerce
UK-testing
JP-dashboard
Clear tags make proxy management easier, especially when you are working with different countries, platforms, or client accounts.
Step 6: Create and Run the Hidemyacc Profile
After the proxy test succeeds, click Create to save the browser profile.
Return to the Profiles page. The new profile should now appear in the profile list. When you are ready to open the browser environment, click Run.
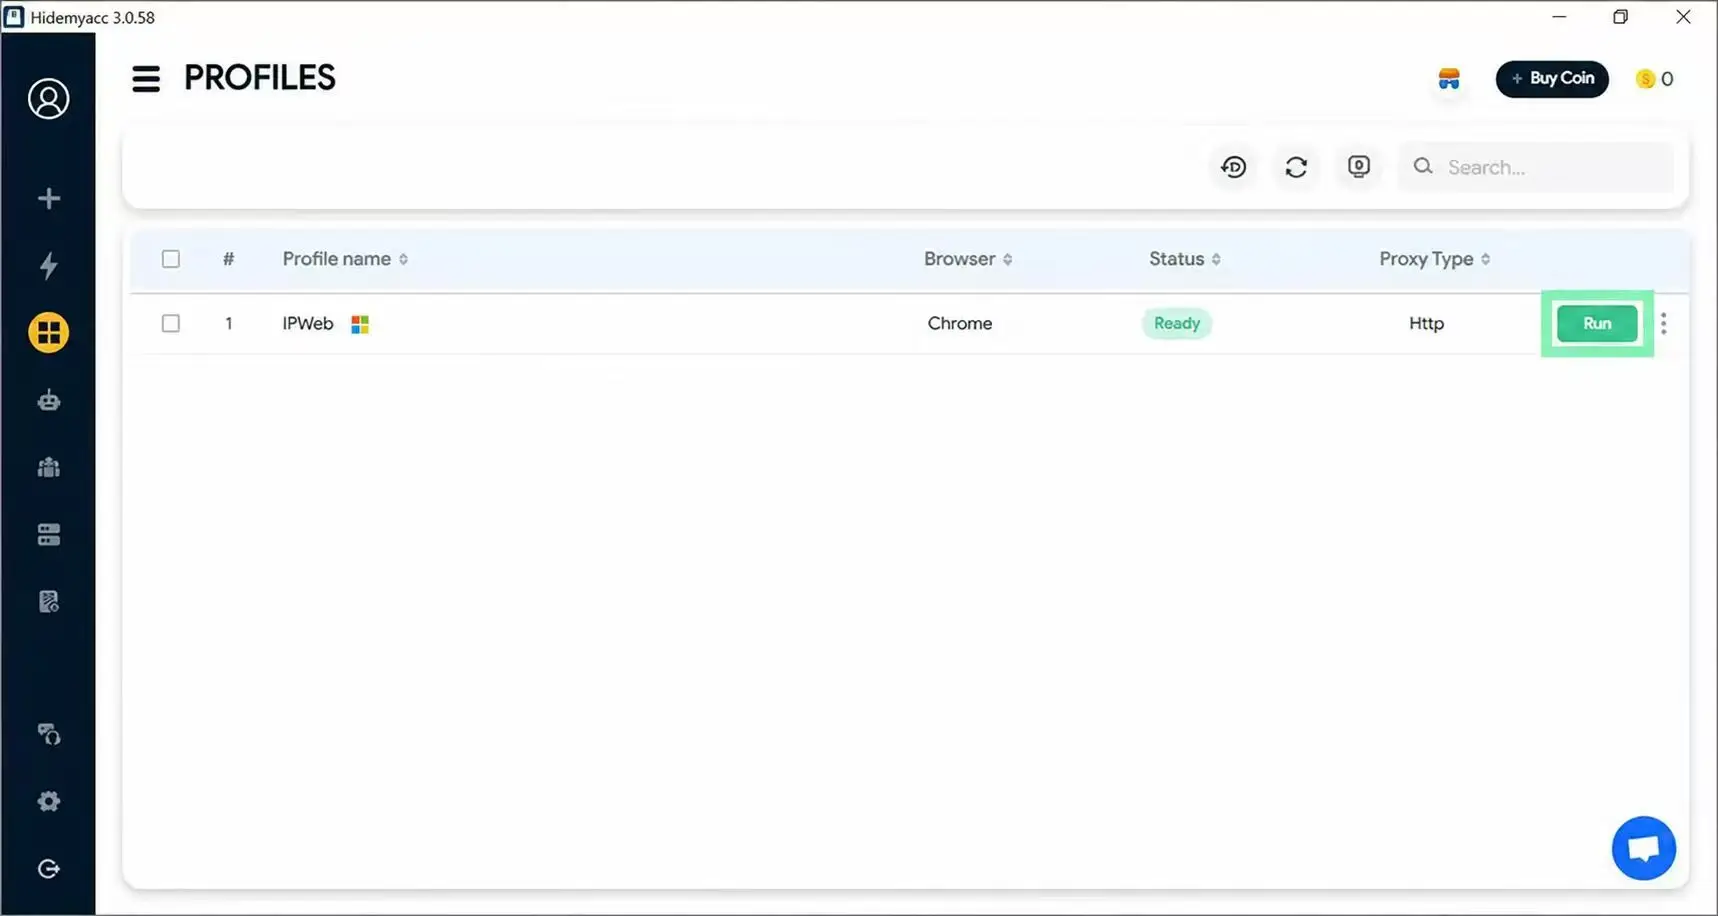
Once the profile opens, visit an IP checking website to confirm that the browser is using the proxy IP instead of your local IP.
Check the following details:
- IP address
- Country or region
- City
- ZIP code
- DNS information
- WebRTC leak status
- Proxy status
- Blacklist status
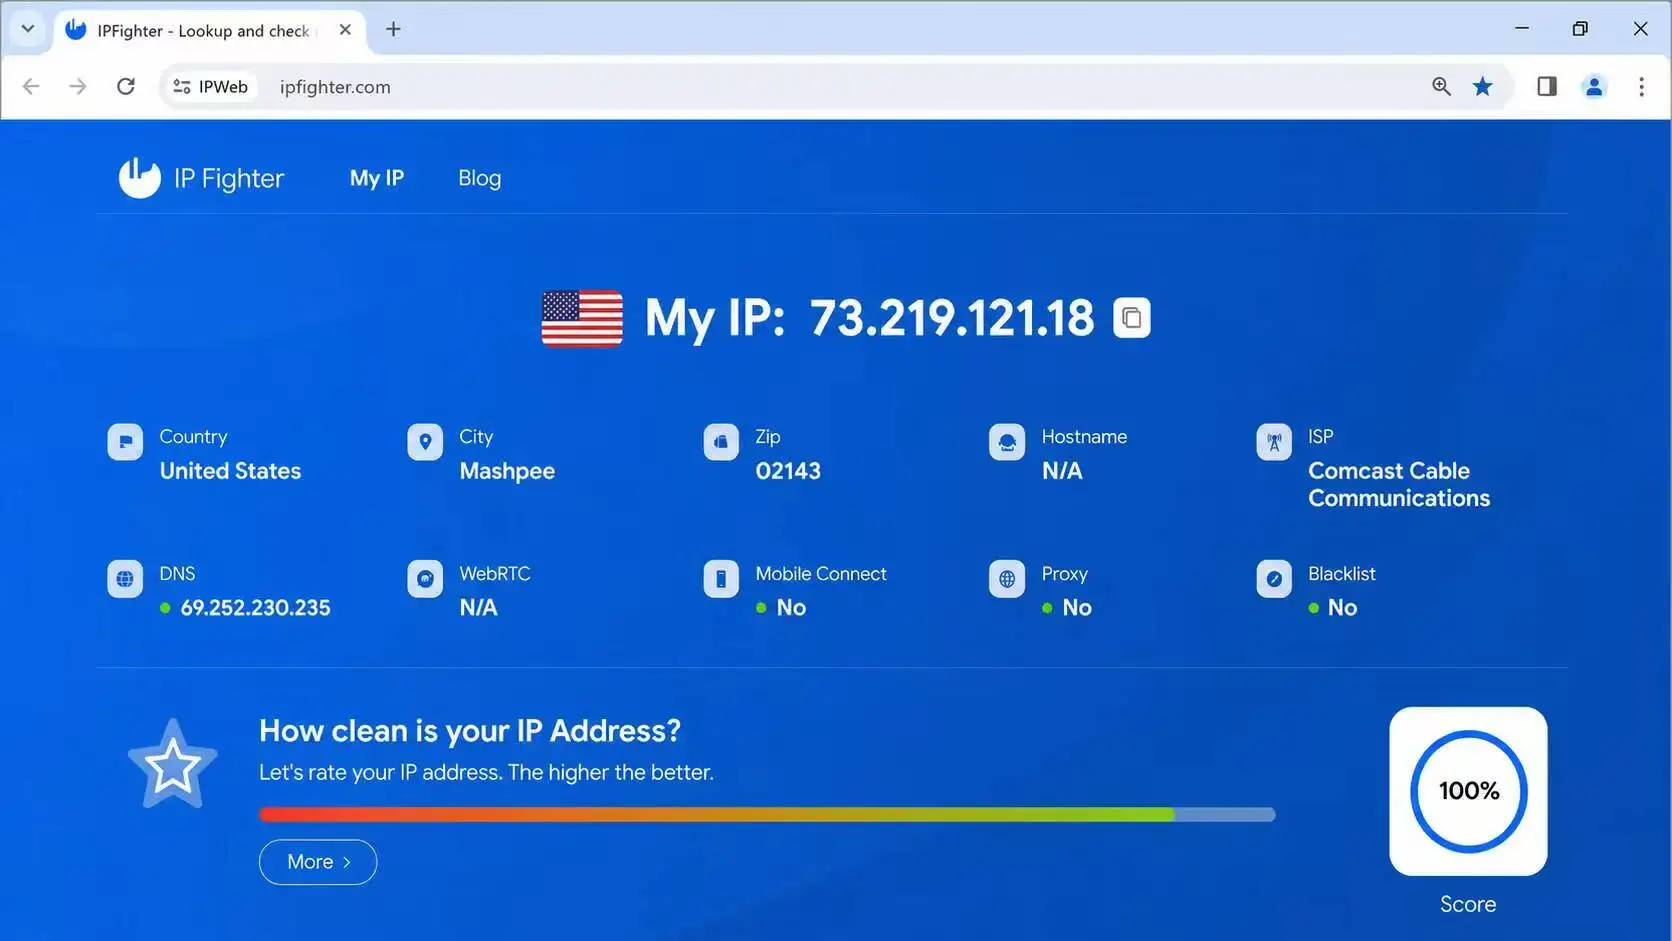
In this example, the IP checking result shows the proxy IP address 73.219.121.18, located in the United States. It also shows city, ZIP code, ISP, DNS, WebRTC, proxy status, blacklist status, and IP score information.
If the proxy country is the United States, but the browser time zone, language, or device settings are set to a completely different region, you may want to adjust the profile settings. Keeping IP, time zone, language, and location signals aligned makes the profile look more natural.
Batch Assign Proxies to Multiple Profiles
If you manage many Hidemyacc profiles, assigning proxies one by one can take time. A practical workflow is:
- Add all IPWeb proxies to Hidemyacc first.
- Label proxies by country, use case, or account group.
- Create or edit browser profiles.
- Assign one proxy to each profile.
- Test several profiles before using them.
For important profiles, avoid assigning the same proxy to too many unrelated profiles. If profiles are meant to stay separate, their network identities should stay separate as well.
Common Hidemyacc Proxy Issues and Fixes
Proxy setup is usually straightforward, but connection problems can happen. Here are the most common issues.
The Proxy Test Fails
First, check the proxy format.
Correct format:
Host:Port:Username:PasswordIncorrect format:
Username:Password:Host:PortAlso check whether you selected the correct protocol. If the proxy is SOCKS5, do not add it as HTTP.
Authentication Error
An authentication error usually means the username or password is incorrect.
Copy the proxy credentials again from IPWeb and make sure there are no extra spaces. If you recently changed your proxy password, wait a short time and test again.
Connection Timeout
A timeout can happen when the proxy server is unreachable, the selected region is slow, or the target website is not responding properly.
Try these fixes:
- Test another IPWeb proxy.
- Choose a proxy server closer to your target region.
- Switch protocol if your plan supports it.
- Check whether the proxy is still active.
Proxy Works in Hidemyacc but Websites Load Slowly
This usually points to network latency or proxy quality for that specific route. Try using a proxy location closer to the website you are visiting.
For example, if you are accessing a US-based platform, a US proxy will usually perform better than a proxy from a distant region.
The IP Location Is Not What You Expected
Go back to your IPWeb dashboard and check the country, state, city, or session settings used when generating the proxy.
If you selected a random or session-based location option, the exit IP may change depending on the proxy configuration. For profiles that need a stable location, use a fixed region or long-session setup.
The IP Checker Shows a Different City
IP location databases are not always identical. One IP checking website may show a city-level location that differs from another database. If the country, region, and ISP information are generally consistent with your selected proxy, a small city-level difference is usually not unusual.
Best Practices for Using IPWeb with Hidemyacc
For important accounts, use one stable proxy per profile whenever possible. Constantly switching IP addresses can make account activity look less consistent.
Keep the profile environment aligned with the proxy. If the proxy is from the United States, the profile should not look like it is browsing from a completely unrelated region.
Use labels in Proxy Manager. As your proxy list grows, labels help you quickly identify which proxy belongs to which task.
Always test the profile after launching it. A successful proxy check inside Hidemyacc is useful, but the final confirmation should happen inside the browser environment.
Avoid mixing unrelated accounts on the same proxy. If profiles are meant to stay separate, their network identities should stay separate as well.
FAQ
Does Hidemyacc work without a proxy?
Yes, Hidemyacc can run without a proxy. However, all profiles may use your local IP address unless you configure proxies. For multi-profile workflows, using proxies is usually recommended.
Which proxy format does Hidemyacc use?
Hidemyacc commonly uses this format:
Host:Port:Username:PasswordUse one proxy per line when adding multiple proxies.
Should I use HTTP or SOCKS5 in Hidemyacc?
HTTP(S) is suitable for most browser-based tasks. SOCKS5 is useful when you need broader protocol support or prefer SOCKS-based connections. The selected protocol in Hidemyacc must match the proxy protocol from IPWeb.
Can I use one proxy for multiple Hidemyacc profiles?
Technically, yes. But for better separation, important profiles should use different proxies. Using the same proxy across many profiles may make them easier to associate with each other.
Why does my proxy pass the test but the website still blocks me?
A proxy is only one part of the browsing environment. Websites may also check browser fingerprint, cookies, account history, behavior patterns, time zone, WebRTC, DNS, and login location. Check the full profile environment, not only the proxy.
What should I do if the proxy location is wrong?
Check your IPWeb proxy generation settings. Make sure you selected the correct country or region. If you are using session-based proxies, the exit IP may change depending on your configuration.
Final Thoughts
Setting up IPWeb proxies in Hidemyacc is simple once you understand the format and workflow. Copy the proxy from your IPWeb dashboard, create a Hidemyacc profile, review the advanced browser settings, enter the proxy details, check the connection, save the profile, and verify the final IP address after launching the browser.
For casual testing, a basic proxy setup may be enough. For account management or long-term browser profiles, consistency matters more. Keep the proxy location, browser time zone, language, and usage behavior aligned so each Hidemyacc profile has a clean and realistic browsing environment.