
BitBrowser is a browser profile management tool that helps users create separate browsing environments for regional testing, workspace management, QA tasks, and other browser-based workflows. Each profile can have its own cookies, fingerprint settings, time zone, language, location settings, and proxy configuration.
When a BitBrowser profile is created without a proxy, it may still connect through your local network IP address. This can cause problems when you need the browser environment to match a specific country, region, or network location.
This guide shows you how to add IPWeb proxies to BitBrowser, enter the proxy details correctly, test the connection, verify the final IP address, and fix common proxy setup issues.
What You Need Before Setting Up a BitBrowser Proxy
Before you start, make sure BitBrowser is already installed and that you can log in to the application. You should also have an active IPWeb proxy plan and access to your IPWeb dashboard.
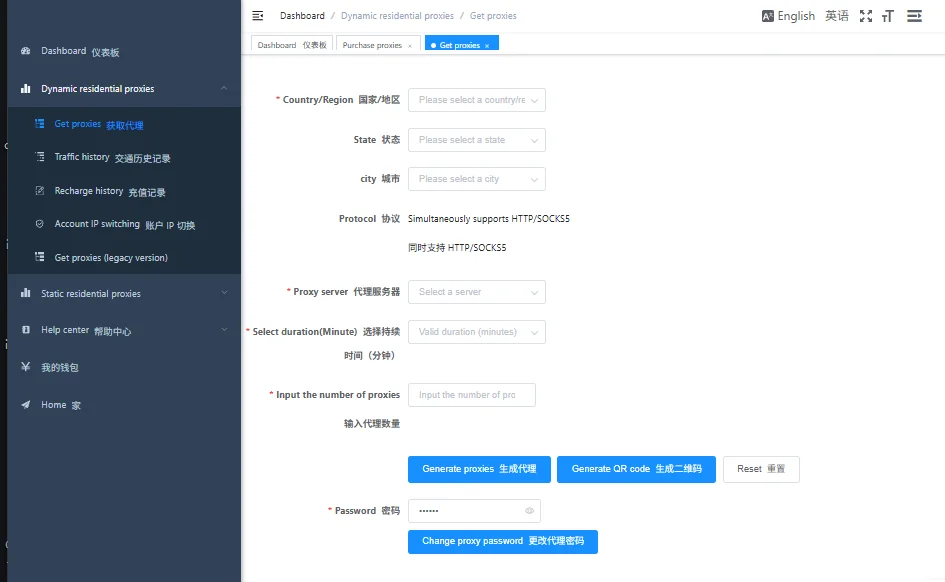
From the IPWeb dashboard, prepare the following proxy details:
- Proxy type: HTTP, HTTPS, or SOCKS5
- Host: the proxy server address
- Port: the proxy port
- Username: your proxy authentication username
- Password: your proxy authentication password
- Country or region: the proxy location you selected
- Session type: rotating, sticky, static, or long-session, depending on your proxy plan
A typical IPWeb proxy string may look like this:
gate1.ipweb.cc:7778:your_username:your_passwordIn BitBrowser, do not paste the whole string into one field. Split it into separate fields:
- Host: gate1.ipweb.cc
- Port: 7778
- Username: your_username
- Password: your_password
How BitBrowser Proxy Settings Work
BitBrowser proxy settings are usually configured at the profile level. This means each browser profile can use its own proxy, country, and network route instead of sharing one global device connection.
BitBrowser controls the browser profile environment, while IPWeb provides the proxy network connection. A reliable setup should keep both parts consistent. For example, if you choose a US proxy, the profile time zone, language, and location settings should also make sense for a US browsing environment.
The proxy does not work alone. The visible IP address, DNS status, WebRTC behavior, time zone, language, and geolocation settings should all be checked together after the profile is launched.
Choosing the Right IPWeb Proxy for BitBrowser
The best proxy type depends on how the BitBrowser profile will be used. A short regional test may not need the same setup as a long-running browser workspace. For stable workspaces, consistency is usually more important than frequent IP changes.
| BitBrowser Use Case | Recommended IPWeb Proxy | Why It Matters | |
|---|---|---|---|
| Long-running browser workspace | Static Residential, Static ISP, or Dynamic Long Session ISP proxy | Keeps the network environment more consistent over time | |
| Regional website testing | Rotating Residential proxy | Allows testing from different countries or regions | |
| Client dashboard or marketplace workspace | Stable Residential or ISP proxy | Reduces unnecessary IP changes during regular access | |
| Location-based content review | Residential proxy from the target region | Helps the browsing environment match the selected location | |
| General browser access | HTTP or HTTPS proxy | Simple and compatible with most browser-based tasks | |
| SOCKS5-specific workflows | SOCKS5 proxy | Useful when the browser profile or tool requires SOCKS5 support |
For important profiles, avoid changing countries too often. A stable IP region usually looks more consistent than a profile that jumps between unrelated locations. If you need a fixed browsing environment for long-running profiles, an IPWeb Static Residential proxy can help keep the network location stable across sessions.
Step 1: Copy Your Proxy Details from IPWeb
Log in to your IPWeb dashboard and generate the proxy you want to use in BitBrowser. Choose the country or region, protocol type, and session setting based on your actual workflow.
After the proxy is generated, copy the proxy credentials carefully. Check for extra spaces, missing characters, or wrong separators. Small formatting mistakes are one of the most common reasons proxy tests fail inside browser profile tools.

Step 2: Create or Edit a Browser Profile in BitBrowser
Open BitBrowser and go to the profile management area. You can create a new profile or edit an existing one. If this is your first time testing a proxy setup, creating a new profile is usually cleaner because it avoids old settings from affecting the result.
Give the profile a clear name so you can identify its region, task, or project later. This becomes more important when you manage many browser profiles.
US-testing-profile-01
UK-workspace-profile-02
DE-market-review-03
JP-dashboard-profile-04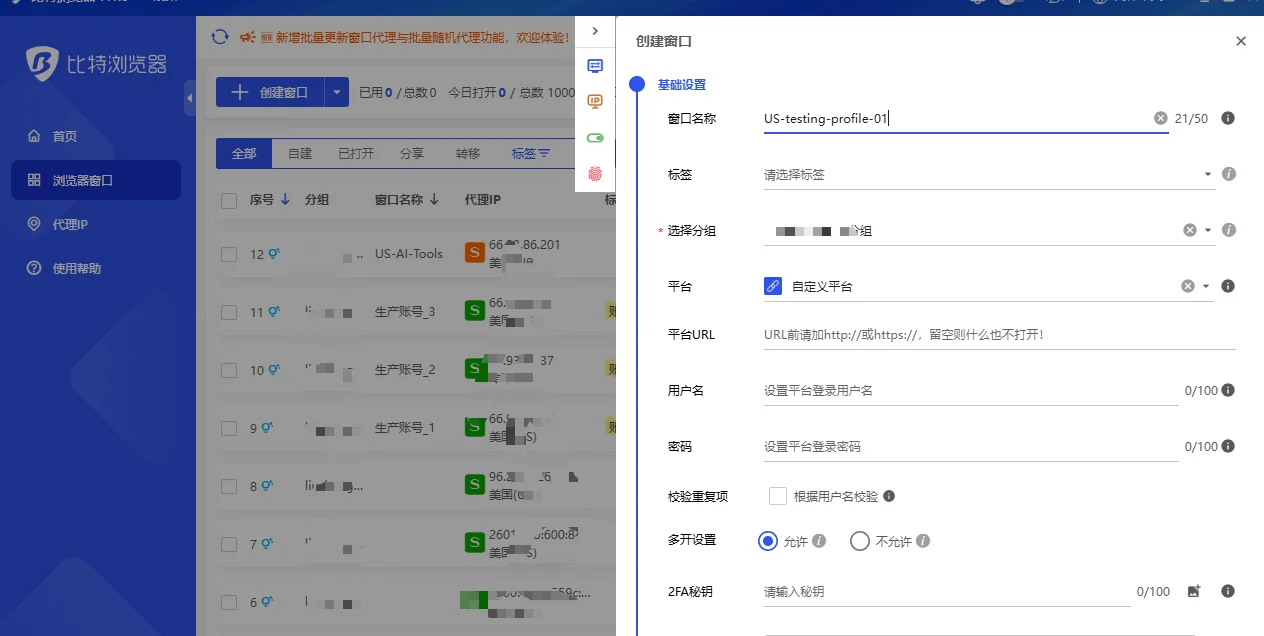
Step 3: Open the Proxy Settings in BitBrowser
Inside the BitBrowser profile settings, find the proxy configuration section. This is where you define how the profile connects to the internet.
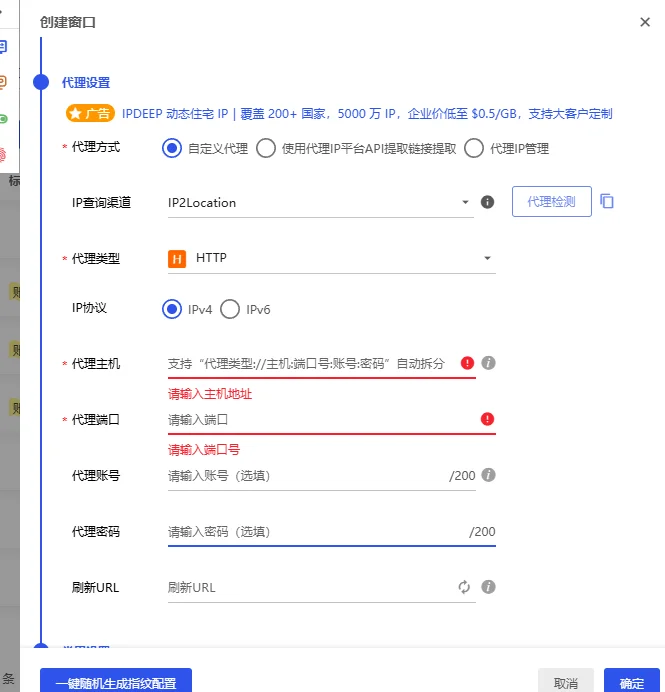
Select the proxy type that matches your IPWeb proxy. If the IPWeb proxy is HTTP or HTTPS, choose the matching HTTP or HTTPS option in BitBrowser. If the proxy is SOCKS5, choose SOCKS5.
The protocol must match. If a SOCKS5 proxy is entered as HTTP, or an HTTP proxy is entered as SOCKS5, the connection test will usually fail.
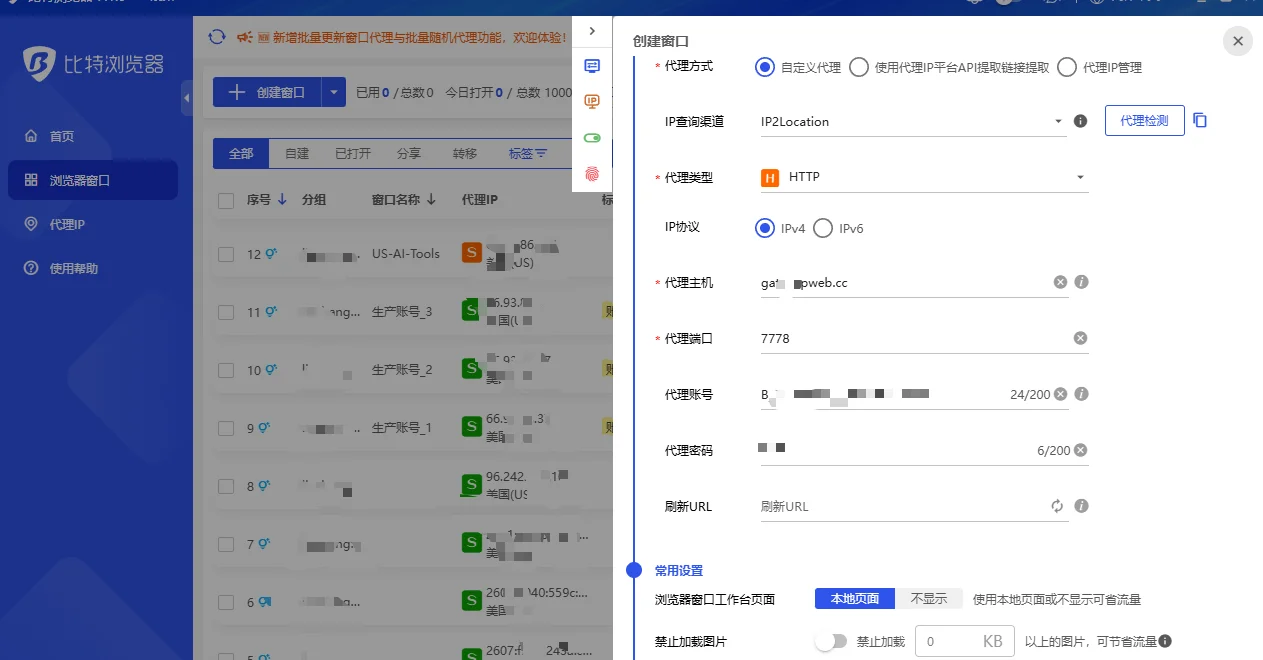
Step 4: Enter IPWeb Proxy Details
Enter the IPWeb proxy credentials into the correct BitBrowser fields. If your proxy is displayed as a full string, split it into host, port, username, and password before saving.
Example IPWeb proxy:
gate1.ipweb.cc:7778:your_username:your_passwordCorrect field mapping in BitBrowser:
- Proxy type: HTTP, HTTPS, or SOCKS5
- Host: gate1.ipweb.cc
- Port: 7778
- Username: your_username
- Password: your_password
Before moving to the next step, check that the host field only contains the server address. Do not include the port, username, or password inside the host field.
Step 5: Test the Proxy Connection
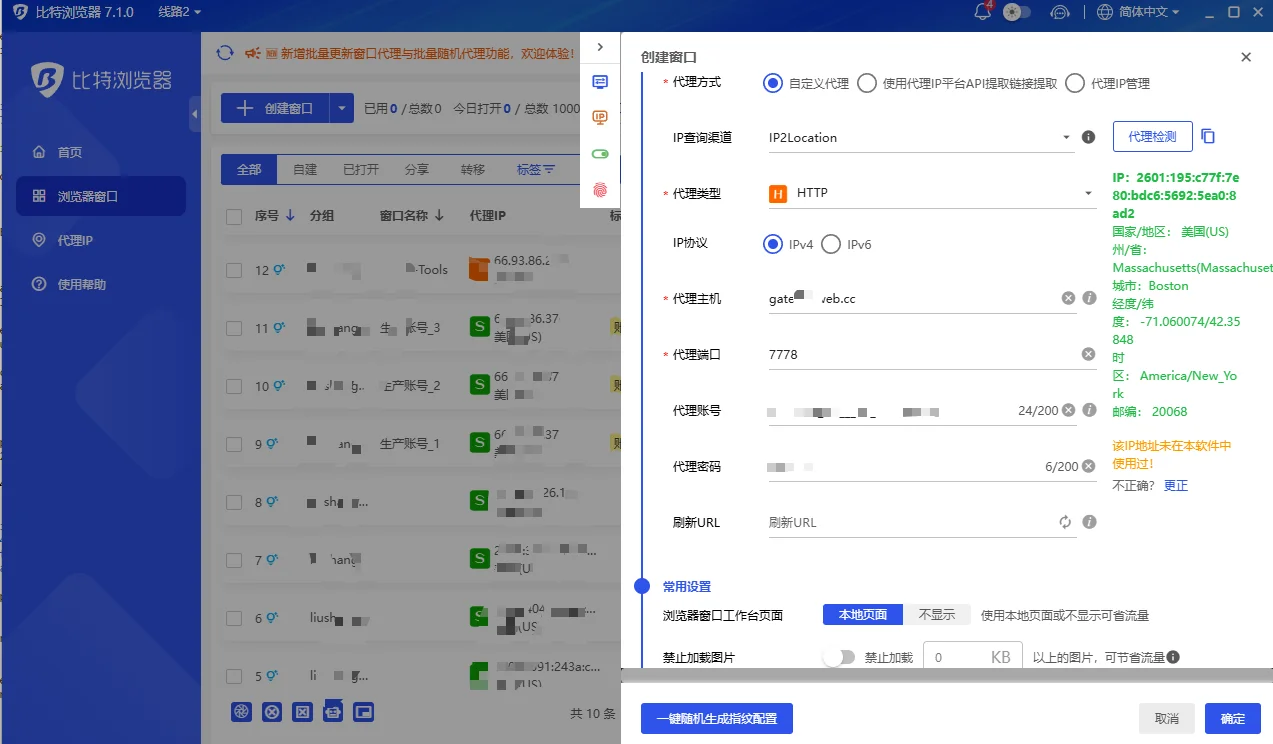
After entering the proxy details, use the proxy test or proxy check option in BitBrowser. This confirms whether BitBrowser can connect through the IPWeb proxy and whether the authentication details are valid.
If the test succeeds, the proxy server is reachable and the credentials are accepted. If the test fails, check the proxy type, host, port, username, and password before saving or launching the profile.
Step 6: Match Profile Settings with the Proxy Location
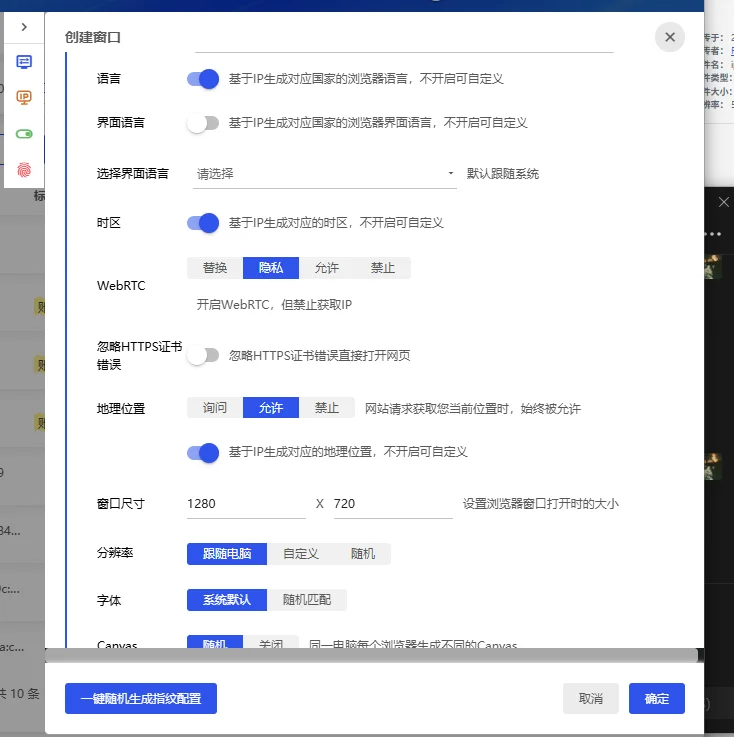
After the proxy test succeeds, review the profile environment. This step is important because websites do not only see the IP address. They may also read signals such as time zone, language, geolocation permission, DNS behavior, and WebRTC status.
If you are using a US proxy, the time zone and language should not obviously point to an unrelated region. If you are using a German proxy, the profile should not look like it is browsing from a completely different country.
You do not need to change every advanced setting manually. Focus on fixing obvious conflicts between the proxy location and the browser profile environment.
Step 7: Launch the Profile and Verify the IP Address
Once the proxy is saved and the profile settings look consistent, launch the BitBrowser profile.
After the browser opens, use an IP checking tool to confirm that the profile is using the IPWeb proxy instead of your local IP address.
Check the following details:
- IP address
- Country or region
- City-level location, if needed
- ISP or network type
- DNS status
- WebRTC leak status
- Time zone
- Language and geolocation consistency
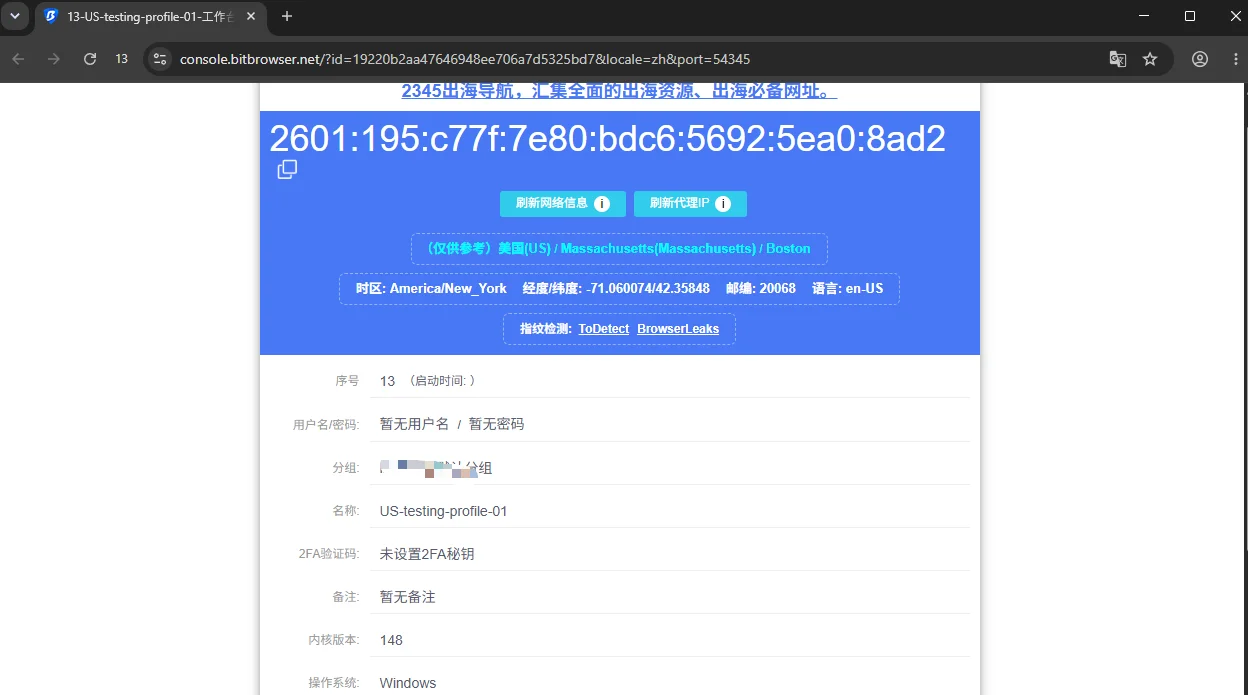
A successful proxy test inside BitBrowser is useful, but the final confirmation should happen inside the launched browser. That is the actual environment websites will see.
Managing Multiple IPWeb Proxies in BitBrowser
If you use BitBrowser for several profiles, organize your proxies before assigning them. Do not treat every proxy as interchangeable. Important profiles should have a clear proxy assignment and a consistent region.
A practical workflow is:
- Generate IPWeb proxies based on country, project, or profile group.
- Create BitBrowser profiles for each browser workspace.
- Assign one suitable proxy to each important profile.
- Keep notes about which proxy belongs to which profile.
- Test the profile before using it for important browsing tasks.
You can use clear profile names like these:
US-testing-01
US-workspace-02
UK-market-review-01
DE-dashboard-01
JP-profile-group-03
For short-term regional tests, rotating residential proxies can be useful. For long-running profiles, static residential, static ISP, or Dynamic Long-Session ISP proxies are usually better choices because they keep the network environment more stable.
Common BitBrowser Proxy Issues and Fixes
Most BitBrowser proxy problems come from incorrect proxy details, wrong protocol selection, expired sessions, unstable routes, or a mismatch between the proxy location and the profile settings.
| Issue | Likely Reason | What to Do |
|---|---|---|
| Proxy test failed | Wrong host, port, or protocol | Recheck the IPWeb proxy details and selected proxy type |
| Authentication error | Incorrect username or password | Copy the proxy credentials again from the IPWeb dashboard |
| Connection timeout | The route is slow, unavailable, or temporarily unstable | Try another proxy session, region, or test again later |
| Wrong proxy country | The wrong region was selected when generating the proxy | Generate a new proxy with the correct location |
| Browser still shows local IP | The proxy settings were not saved or the profile is not using them | Reopen the profile and confirm the proxy fields |
| IP changes unexpectedly | A rotating or dynamic session changed | Use a sticky, static, or long-session proxy for stable profiles |
| Website still shows extra checks | Other browser or network signals may be inconsistent | Review cookies, time zone, DNS, WebRTC, language, and profile settings |
Proxy Test Failed
Start with the proxy protocol. If your IPWeb proxy is SOCKS5, select SOCKS5 in BitBrowser. If it is HTTP or HTTPS, select the matching HTTP or HTTPS option.
Then check the host, port, username, and password one by one. If your proxy is shown as:
gate1.ipweb.cc:7778:your_username:your_passwordThe host field should only contain:
gate1.ipweb.ccThe port, username, and password should be entered into their own fields.
Authentication Error
An authentication error usually means the proxy username or password is incorrect. Copy the credentials again from IPWeb and make sure there are no spaces before or after the text.
Connection Timeout
A timeout may happen when the selected route is slow, the proxy session is no longer available, or the target website is not responding properly. Try another IPWeb proxy, choose another region, or test again after a short time.
The IP Location Looks Different
IP location databases are not always identical. One IP checker may show a slightly different city from another. If the country, region, and network type are generally correct, a small city-level difference is usually not unusual.
The Proxy Works, but the Browser Environment Still Looks Inconsistent
A proxy only changes the network route. The browser profile may still expose other signals, such as time zone, language, DNS, WebRTC, geolocation settings, cookies, or previous browsing data. If the proxy works but the environment still does not look consistent, review the full BitBrowser profile instead of changing only the IP address.
Best Practices for BitBrowser Proxy Setup
Use one stable proxy for each important profile whenever possible. This helps keep the browsing environment consistent over time.
Keep the proxy location and profile settings aligned. A profile using a US proxy should not have an obviously unrelated time zone, language, or geolocation setting.
Avoid using the same proxy for unrelated projects or regions. If profiles are meant to represent different regions or projects, their network settings should stay separate as well.
Test the proxy before using the profile for important tasks. A quick proxy check can prevent avoidable connection errors and setup problems.
Use clear names for profiles and proxies. This makes your BitBrowser workspace easier to manage as the number of profiles grows.
FAQ
What is BitBrowser used for?
BitBrowser is used to create and manage separate browser profiles. Each profile can have its own cookies, fingerprint settings, proxy settings, time zone, language, and location settings.
Does BitBrowser support proxies?
Yes. BitBrowser supports proxy configuration for browser profiles. You can refer to the official BitBrowser proxy documentation for more details, then enter your IPWeb proxy type, host, port, username, and password in the profile settings.
How do I use IPWeb proxies in BitBrowser?
Create or edit a BitBrowser profile, open the proxy settings, choose the correct proxy type, and enter the IPWeb proxy host, port, username, and password. Then test the proxy and verify the IP address after launching the browser.
Can I use SOCKS5 proxies in BitBrowser?
Yes. If your IPWeb proxy supports SOCKS5, select SOCKS5 in BitBrowser and enter the corresponding host, port, username, and password.
Should I use rotating or static proxies with BitBrowser?
For long-running browser profiles, static or long-session proxies are usually better because they provide a more consistent network environment. For short-term regional testing, rotating residential proxies can be more flexible.
Why is my BitBrowser proxy not working?
Common reasons include the wrong proxy type, incorrect host or port, invalid username or password, an unavailable proxy session, or profile settings that were not saved correctly.
Why does BitBrowser still show my local IP?
This usually means the proxy settings were not saved, the wrong profile was launched, or the proxy was entered into the wrong fields. Reopen the profile, check the proxy section, and test the connection again.
Do I need to check DNS and WebRTC after setting up a proxy?
Yes. A proxy test confirms the connection, but DNS and WebRTC checks help confirm what the launched browser environment actually exposes. For a cleaner setup, check the IP address, DNS status, WebRTC status, time zone, and language together.
Final Thoughts
Setting up IPWeb proxies in BitBrowser is straightforward when the proxy details are entered correctly. The key steps are to copy the proxy information from IPWeb, create or edit a BitBrowser profile, select the correct proxy type, enter the host, port, username, and password, test the connection, and verify the final IP address after launching the browser.
For short-term regional tests, Dynamic Residential proxies can be useful. For long-running profiles, static residential, static ISP, or Dynamic Long Session ISP proxies are usually better choices because they keep the network environment more stable.
You can also explore more proxy integration guides to learn how to use IPWeb proxies with other browser profile tools and proxy setup workflows.