
When you need to check how the same website appears in different countries, changing your system proxy for every test is slow and easy to get wrong. Proxy SwitchyOmega gives you a cleaner way to manage browser-level proxy profiles, so you can switch locations from the toolbar instead of editing network settings each time.
This is useful for practical browser checks. An e-commerce analyst may need to compare product prices in the United States, Germany, and the United Kingdom. An SEO specialist may want to review localized search results from different markets. A QA team may need to confirm that a landing page, language version, or regional offer loads correctly before a campaign goes live.
In this guide, you’ll set up IPWeb proxies in Proxy SwitchyOmega, SwitchyOmega 3, or ZeroOmega, create separate profiles for different regions, verify the active proxy IP, and use the profiles for real browser testing.
Why Use IPWeb with SwitchyOmega?
SwitchyOmega handles the browser-side profile switching. IPWeb provides the proxy endpoints used inside those profiles. Together, they make it easier to test regional pages, search results, pricing pages, and landing pages without changing your system proxy every time.
Use IPWeb proxy locations across 220+ countries and regions to review market-specific pages in a browser.
Choose residential, long session ISP, datacenter, or mobile proxies based on what you need to verify.
Create saved browser profiles for different markets and switch them directly from the toolbar.
Configure HTTP, HTTPS, or SOCKS5 endpoints when supported by your proxy plan and browser setup.
For most manual browser testing, start with a residential proxy profile because regional page behavior often depends on local network context. If your test requires a longer, more stable browser session, use a long session ISP endpoint instead.
When This Integration Works Best
This setup is best for manual browser workflows where a person needs to inspect the result directly. It is especially useful when you need to compare several countries or regions during the same testing session.
| Workflow | How SwitchyOmega Helps | Suggested IPWeb Proxy Type |
|---|---|---|
| Regional product page review | Switch between countries to compare price, stock, language, and delivery messages. | Dynamic Residential Proxies |
| Localized SEO checks | Review search pages and localized SERP differences from different markets. | Dynamic Residential Proxies |
| Landing page QA | Check whether regional offers, language versions, and redirect behavior load correctly. | Long Session ISP Proxies |
| Fast internal browser testing | Use a stable proxy profile for speed-focused QA where consumer network context is not required. | Static Datacenter Proxies |
| Mobile page review | Check mobile network behavior, app landing pages, or mobile ad pages. | Mobile Proxies |
SwitchyOmega is not the right tool for every proxy workflow. For code-based browser automation, use a framework such as Playwright or Puppeteer. For large-scale public web data workflows, a managed scraping API is usually more efficient than a manual browser extension.
Example Workflow: Checking a Product Page from Three Markets
To make the setup practical, this guide uses one example: checking the same e-commerce product page from three regions.
- United States: Check USD pricing, delivery messages, and page availability.
- Germany: Check EUR pricing, German language content, and local stock status.
- United Kingdom: Check GBP pricing, regional promotions, and shipping information.
Instead of editing one proxy setting repeatedly, create three saved profiles in SwitchyOmega:
IPWeb-US-Residential IPWeb-DE-Residential IPWeb-UK-ResidentialAfter the profiles are saved, you can switch between them from the browser toolbar, refresh the same page, and compare what changes by region.
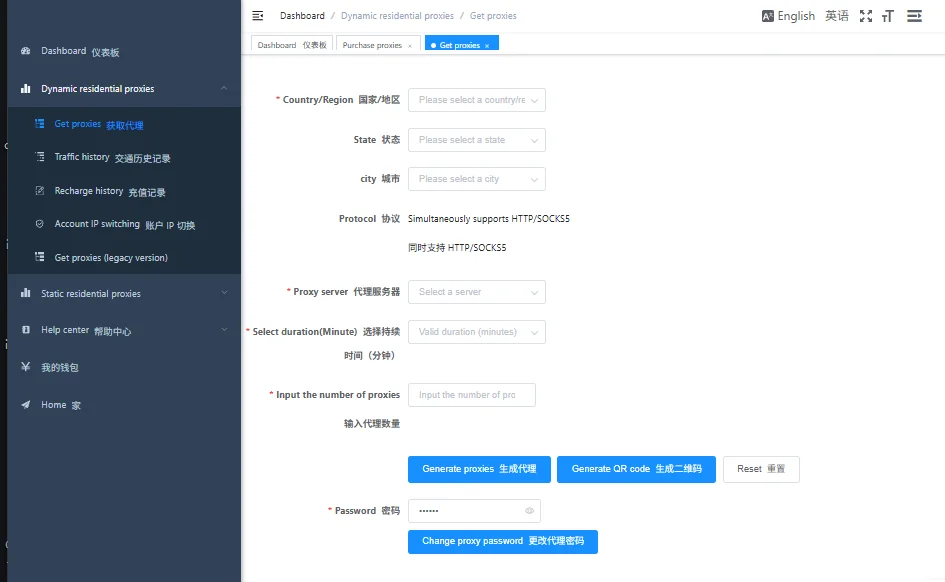
Step 1: Get Proxy Details from IPWeb
Before opening SwitchyOmega, log in to your IPWeb account and prepare the proxy endpoint you want to use. This is the first step many users miss. SwitchyOmega does not generate proxy credentials by itself; it only stores and applies the proxy information you enter.
In your IPWeb dashboard, choose the proxy type and location for your workflow. For the example above, you may create one residential proxy endpoint for the United States, one for Germany, and one for the United Kingdom.
You will need these details for each profile:
| IPWeb Detail | Where It Goes in SwitchyOmega |
|---|---|
| Protocol | Select HTTP, HTTPS, or SOCKS5 in the protocol row. |
| Host | Enter it in the Server field. |
| Port | Enter it in the Port field. |
| Username | Enter it after clicking the lock icon or authentication option. |
| Password | Enter it after clicking the lock icon or authentication option. |
If your IPWeb dashboard gives you a combined proxy string, split it before entering the details into SwitchyOmega.
host:port:username:passwordIn SwitchyOmega, this becomes:
Server: host Port: port Username: username Password: passwordDo not paste the full proxy string into the Server field. The Server field should usually contain only the proxy host or IP address. The port, username, and password should be entered in their own fields.
Step 2: Install Proxy SwitchyOmega or ZeroOmega
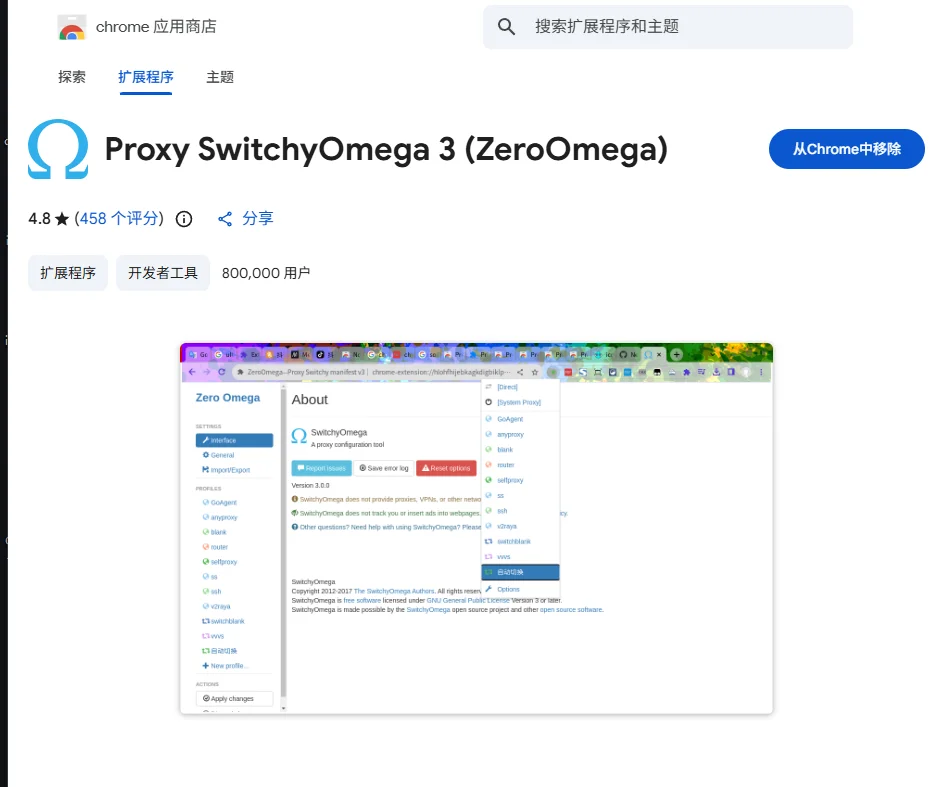
Open the Chrome Web Store or your browser’s extension store and search for Proxy SwitchyOmega, SwitchyOmega 3, or ZeroOmega. Install the extension and pin it to the browser toolbar.
Pinning the extension is useful because the profile switcher is the main control you will use during testing. If you are checking several regions, you do not want to open the full settings page every time.
Step 3: Create a New Proxy Profile
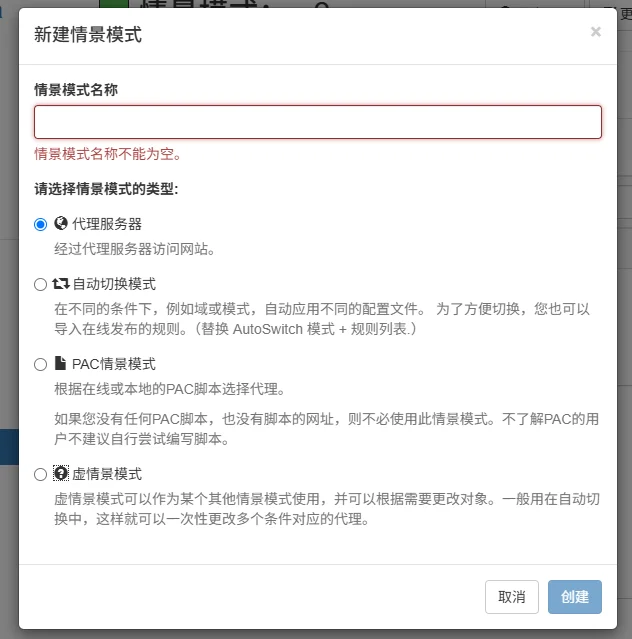
Click the SwitchyOmega icon and open Options. In the options page, click New Profile. Use a name that clearly identifies the proxy location or task.
For the product page example, start with the United States profile:
IPWeb-US-ResidentialChoose Proxy Profile as the profile type, then click Create. This profile type allows you to enter a proxy protocol, server, port, and authentication details.
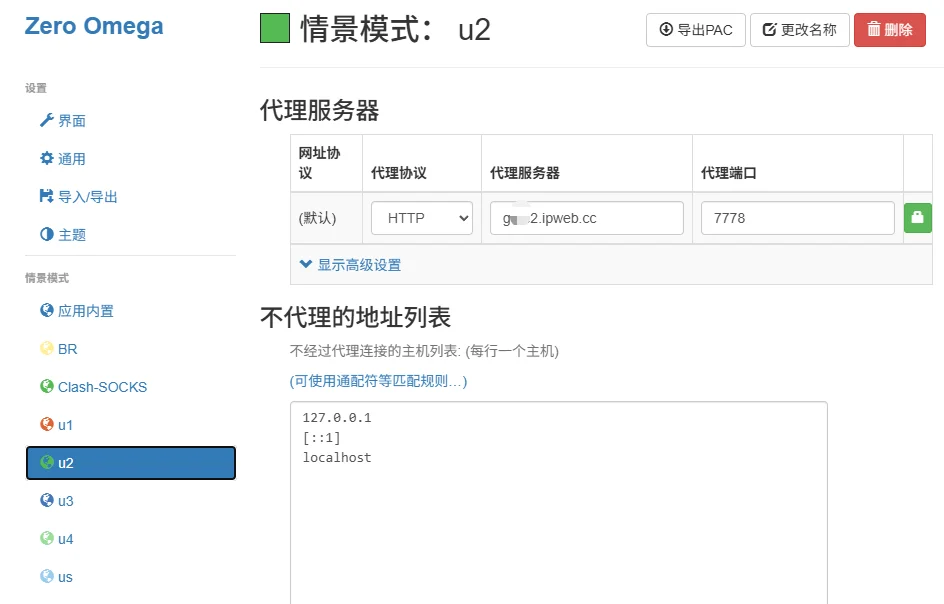
Step 4: Enter the Protocol, Server, and Port
Inside the profile, choose the protocol that matches your IPWeb proxy endpoint. For most browser testing workflows, HTTP or HTTPS is the easiest option to start with.
Then enter the proxy host in the Server field and the proxy port in the Port field.
Protocol: HTTP Server: your-ipweb-proxy-host Port: your-ipweb-proxy-portKeep the host clean. If your proxy information includes username and password, do not put them into the Server field.
Correct: Server: proxy-host Port: 8000 Incorrect: Server: http://username:password@proxy-host:8000If the page fails to load later, this is one of the first things to check. Many setup issues come from pasting the full proxy string into the wrong field or selecting a protocol that does not match the endpoint.
Step 5: Add Username and Password Authentication
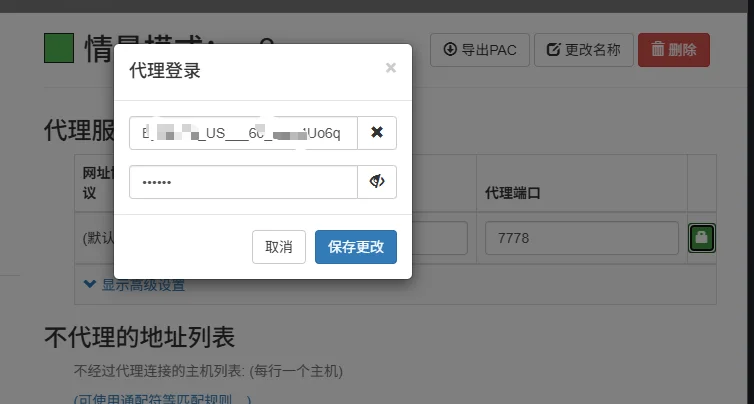
Most IPWeb proxy endpoints require username and password authentication. In SwitchyOmega, click the lock icon next to the proxy row. In the authentication window, enter your IPWeb username and password.
Username: your-ipweb-username Password: your-ipweb-passwordAfter entering the credentials, click Save changes in the authentication window. Then return to the profile page.
If you later see a browser pop-up asking for proxy authentication, the credentials may not have been saved correctly, or the active profile may be using a different endpoint from the one you copied in IPWeb.
If this is your first setup, start with an HTTP or HTTPS proxy endpoint. In Chrome, SOCKS5 username and password authentication may not work natively in the same way as HTTP or HTTPS. If you need to use SOCKS5, use IP allowlisting if your IPWeb account supports it, or confirm the recommended SOCKS5 authentication method in your proxy settings.
Step 6: Apply Changes and Select the Profile
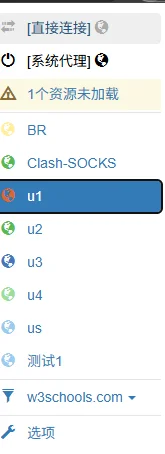
After entering the proxy details and saving the authentication settings, click Apply Changes on the SwitchyOmega options page.
This step is easy to miss. The profile may look complete on the screen, but it will not work properly if the changes were not applied.
Now return to the browser toolbar. Click the SwitchyOmega icon and select the profile you created, such as IPWeb-US-Residential.
From this point on, traffic from that browser should use the selected IPWeb proxy profile. If you want to stop using the proxy, switch back to Direct or System Proxy.
Verify the Proxy Before Testing the Website
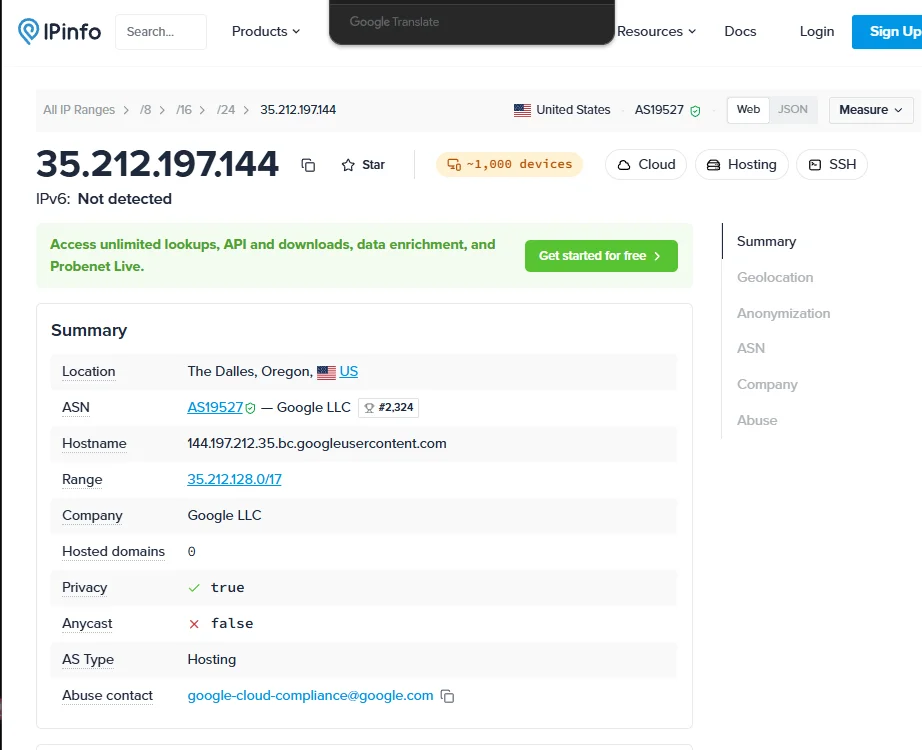
Before opening the product page, search results page, or landing page you want to test, open an IP checking website in the same browser.
The visible IP address should change from your original network IP to the IPWeb proxy exit IP. The displayed country or region should match the proxy location you selected.
A successful setup usually looks like this:
- The IP checker no longer shows your original public IP.
- The detected country or region matches the IPWeb proxy location.
- The browser does not show a proxy authentication prompt.
- Normal websites load after the profile is selected.
If the IP checker still shows your original IP address, the profile is probably not active, the changes were not applied, or the proxy details were entered incorrectly.
Run the Regional Page Test
After confirming the IP address, open the page you want to review. In the e-commerce example, this could be a product page, category page, checkout information page, or promotional landing page.
Check the details that matter for your workflow:
- Currency and price display
- Product availability or stock status
- Shipping message or delivery region
- Language and regional content
- Promotion banners or local campaign messages
- Search result layout or localized ranking differences
If the page still shows content from your original region, clear cookies or open a clean browser profile before testing again. Many websites use more than IP address to decide what content to display. Cookies, account settings, browser language, and previous visits can also affect the result.
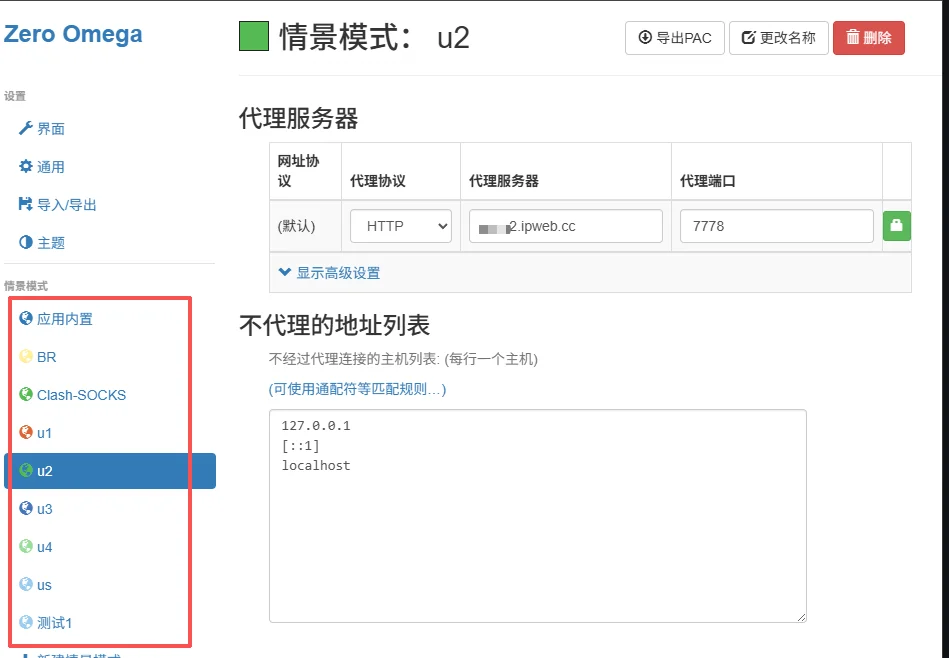
Create More Profiles for Other Markets
The main advantage of SwitchyOmega is not just connecting one proxy. It is being able to switch between several saved profiles quickly.
After the first profile works, repeat the same process for other markets. For the example workflow, create profiles such as:
IPWeb-US-Residential IPWeb-DE-Residential IPWeb-UK-ResidentialEach profile should use the IPWeb endpoint for its own location. Once all profiles are saved, you can switch between them from the browser toolbar, refresh the same page, and compare what changes by region.
Common Issues During Browser Testing
The IP checker still shows my original IP
Make sure the IPWeb profile is selected from the SwitchyOmega toolbar menu. Also return to the options page and confirm that the latest changes were applied with Apply Changes.
The browser asks for proxy username and password
Open the proxy profile again, click the lock icon, and re-enter the username and password in the authentication window. Check for extra spaces when copying credentials from the IPWeb dashboard.
The target page loads, but the region looks wrong
Confirm that the proxy location matches the market you want to test. Then clear cookies or use a clean browser profile. Websites may use browser language, cookies, account region, and previous activity in addition to IP address.
The page does not load after switching profiles
Check the protocol, server, and port. A common mistake is choosing the wrong protocol or pasting the full proxy string into the Server field.
SOCKS5 does not work as expected
Test HTTP or HTTPS first. If you specifically need SOCKS5 in Chrome, username and password authentication may not work natively. Use IP allowlisting if it is available in your proxy setup, or confirm the SOCKS5 authentication method before using it in a browser profile.
The proxy works in Direct mode but not in the selected profile
Switch back to Direct and confirm that your normal internet connection works. Then reselect the IPWeb profile. If only the proxy profile fails, the issue is likely related to protocol, server, port, authentication, or proxy endpoint availability.
Final Browser Testing Checklist
Before using the profile for real work, run through this checklist:
- The correct IPWeb profile is selected in SwitchyOmega.
- The protocol, host, port, username, and password are entered separately.
- The credentials were saved after clicking the lock icon.
- The profile changes were applied.
- The IP checker shows a new proxy IP.
- The country or region matches your intended test market.
- Cookies are cleared if you are checking regional page content.
- The target website loads normally after the profile is enabled.
Once these checks pass, you can use SwitchyOmega with IPWeb to switch browser locations and review how websites, search results, pricing pages, ads, and localized content appear from different markets.