
Puppeteer is a Node.js library for controlling Chrome, Chromium, or Firefox through code. Developers use it for browser automation, web scraping, screenshot capture, form testing, QA checks, and other workflows that need a real browser environment.
When Puppeteer runs without a proxy, all browser traffic comes from the same local IP address or server IP. That may be fine for simple testing, but it is not ideal for regional QA, localization checks, public data workflows, or browser automation tasks that need different network locations.
By adding IPWeb proxies to Puppeteer, you can route browser traffic through a selected proxy server and make your script browse from a specific country, region, or network type. This guide explains how to set up IPWeb proxies in Puppeteer, add proxy authentication, use HTTP and SOCKS5 proxies, rotate proxy sessions, verify the final IP address, and fix common Puppeteer proxy errors.
What You Need Before Setting Up a Puppeteer Proxy
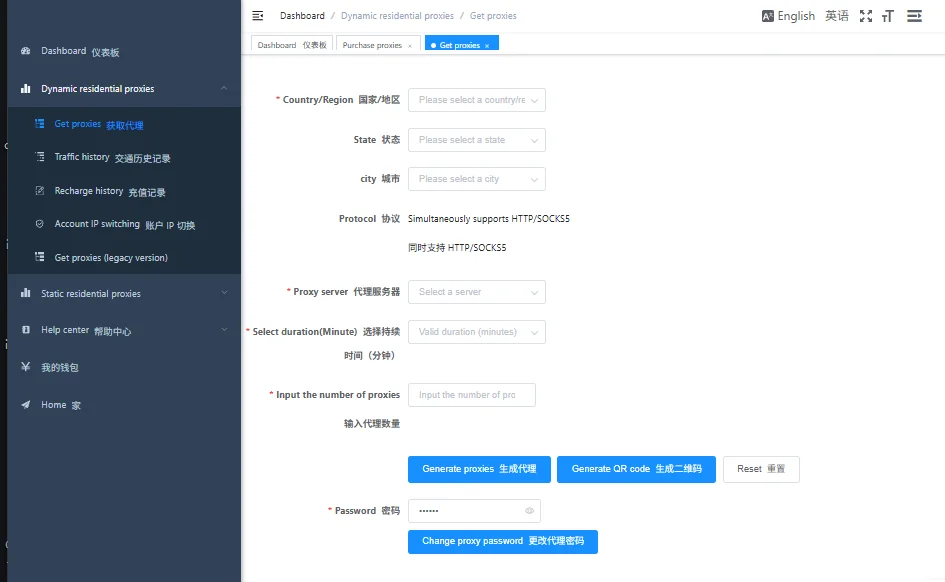
Before writing the script, prepare the basic development environment and your IPWeb proxy details.
- Node.js installed on your computer or server
- A code editor, such as VS Code
- Puppeteer installed in your project
- IPWeb proxy host
- Proxy port
- Proxy username
- Proxy password
- Proxy protocol, such as HTTP, HTTPS, or SOCKS5
- Target country or region
A typical IPWeb proxy string may look like this:
gate1.ipweb.cc:7778:your_username:your_passwordFor Puppeteer, you should split this into two parts:
- Proxy server: gate1.ipweb.cc:7778
- Proxy credentials: your_username and your_password
This matters because Chromium does not reliably accept authenticated proxy URLs in the launch argument. In most Puppeteer setups, the proxy host and port are passed through --proxy-server, while the username and password are handled separately with page.authenticate().
How Puppeteer Proxy Settings Work
Puppeteer itself controls the browser. The proxy is passed to the underlying browser through Chromium launch arguments.
The most common setup uses two steps:
- Use
--proxy-serverinsidepuppeteer.launch()to define the proxy host and port. - Use
page.authenticate()to provide the proxy username and password.
The structure looks like this:
const browser = await puppeteer.launch({
  args: ['--proxy-server=http://gate1.ipweb.cc:7778']
});

const page = await browser.newPage();

await page.authenticate({
  username: 'your_username',
  password: 'your_password'
});
The proxy server and proxy credentials are separate. Do not put the full Host:Port:Username:Password string directly into --proxy-server.
Step 1: Create a Puppeteer Project
Create a new project folder and install Puppeteer.
mkdir puppeteer-ipweb-proxy
cd puppeteer-ipweb-proxy
npm init -y
npm install puppeteer
After installation, create a file named index.js. This file will contain the Puppeteer proxy script.
Step 2: Add an IPWeb HTTP Proxy to Puppeteer
For most browser automation workflows, an HTTP or HTTPS proxy is the easiest option. Use the IPWeb proxy host and port in the --proxy-server argument, then authenticate the page with your proxy username and password.
const puppeteer = require('puppeteer');

const proxyHost = 'gate1.ipweb.cc';
const proxyPort = '7778';
const proxyUsername = 'your_username';
const proxyPassword = 'your_password';

(async () => {
  const browser = await puppeteer.launch({
    headless: true,
    args: [`--proxy-server=http://${proxyHost}:${proxyPort}`]
  });

  const page = await browser.newPage();

  await page.authenticate({
    username: proxyUsername,
    password: proxyPassword
  });

  await page.goto('https://httpbin.org/ip', {
    waitUntil: 'networkidle2',
    timeout: 60000
  });

  const result = await page.evaluate(() => document.body.innerText);
  console.log(result);

  await browser.close();
})();
This script launches a browser, connects through the IPWeb proxy, opens an IP test endpoint, and prints the IP address seen by the destination website.
Step 3: Use a SOCKS5 Proxy in Puppeteer
If your IPWeb plan provides SOCKS5 proxy access, you can use the socks5:// protocol in the proxy server argument. This example is best for SOCKS5 endpoints that do not require browser-level authentication, or for setups where the authentication method has already been confirmed.
const puppeteer = require('puppeteer');

const proxyHost = 'gate1.ipweb.cc';
const proxyPort = '7778';

(async () => {
  const browser = await puppeteer.launch({
    headless: true,
    args: [`--proxy-server=socks5://${proxyHost}:${proxyPort}`]
  });

  const page = await browser.newPage();

  await page.goto('https://httpbin.org/ip', {
    waitUntil: 'networkidle2',
    timeout: 60000
  });

  const result = await page.evaluate(() => document.body.innerText);
  console.log(result);

  await browser.close();
})();
This SOCKS5 example is best used when the SOCKS5 endpoint does not require browser-level username and password authentication, or when the authentication method has already been confirmed in your proxy dashboard. For most authenticated Puppeteer workflows, HTTP or HTTPS proxies are easier to configure because page.authenticate() works cleanly with proxy username and password authentication.
Make sure the protocol matches the proxy you generated in IPWeb. If the proxy is HTTP, use http://. If it is SOCKS5, use socks5://. A protocol mismatch is one of the most common reasons a Puppeteer proxy fails.
Step 4: Verify the Proxy IP Address
A script can run without errors and still use the wrong network route, so always verify the final browsing environment. After launching the browser, open an IP test endpoint and confirm that Puppeteer is using the IPWeb proxy instead of your local IP or server IP.
You can test the IP address with:
await page.goto('https://httpbin.org/ip', {
  waitUntil: 'networkidle2',
  timeout: 60000
});

const result = await page.evaluate(() => document.body.innerText);
console.log(result);
Check the following details when you test the final browser environment:
- IP address
- Country or region
- City-level location, if needed
- ISP or network type
- Proxy status
- DNS information
- WebRTC status, if your workflow uses browser APIs
For a broader proxy testing checklist, see our guide to anonymous web proxy configuration, including IP address, DNS behavior, browser signals, and session consistency.
Step 5: Store Proxy Credentials Safely
For quick testing, hardcoding the proxy username and password may be acceptable. For real projects, avoid putting proxy credentials directly in your source code, especially if the project is stored in Git or shared with a team.
A cleaner approach is to use environment variables.
If you store these values in a local .env file, install dotenv first:
npm install dotenvCreate a .env file in your project root:
IPWEB_PROXY_HOST=gate1.ipweb.cc
IPWEB_PROXY_PORT=7778
IPWEB_PROXY_USERNAME=your_username
IPWEB_PROXY_PASSWORD=your_password
Then read those values in your script:
require('dotenv').config();

const puppeteer = require('puppeteer');

const proxyHost = process.env.IPWEB_PROXY_HOST;
const proxyPort = process.env.IPWEB_PROXY_PORT;
const proxyUsername = process.env.IPWEB_PROXY_USERNAME;
const proxyPassword = process.env.IPWEB_PROXY_PASSWORD;

(async () => {
  const browser = await puppeteer.launch({
    headless: true,
    args: [`--proxy-server=http://${proxyHost}:${proxyPort}`]
  });

  const page = await browser.newPage();

  await page.authenticate({
    username: proxyUsername,
    password: proxyPassword
  });

  await page.goto('https://httpbin.org/ip', {
    waitUntil: 'networkidle2',
    timeout: 60000
  });

  const result = await page.evaluate(() => document.body.innerText);
  console.log(result);

  await browser.close();
})();
This makes the script safer and easier to move between local development, staging, and production servers.
Step 6: Use proxy-chain for Authenticated Proxies
Another common Puppeteer proxy method is to use the proxy-chain package. This approach creates a local proxy URL that Puppeteer can use directly, while proxy-chain handles the upstream proxy authentication.
This is useful when your codebase stores proxies as full authenticated URLs like this:
http://your_username:your_password@gate1.ipweb.cc:7778Install proxy-chain:
npm install proxy-chainThen use it with Puppeteer:
const puppeteer = require('puppeteer');
const proxyChain = require('proxy-chain');

const proxyUrl = 'http://your_username:your_password@gate1.ipweb.cc:7778';

(async () => {
  const anonymizedProxy = await proxyChain.anonymizeProxy(proxyUrl);

  try {
    const browser = await puppeteer.launch({
      headless: true,
      args: [`--proxy-server=${anonymizedProxy}`]
    });

    const page = await browser.newPage();

    await page.goto('https://httpbin.org/ip', {
      waitUntil: 'networkidle2',
      timeout: 60000
    });

    const result = await page.evaluate(() => document.body.innerText);
    console.log(result);

    await browser.close();
  } finally {
    await proxyChain.closeAnonymizedProxy(anonymizedProxy, true);
  }
})();
This method is especially helpful if your codebase stores proxies as full authenticated URLs. Remember to close the anonymized proxy after the browser finishes, otherwise local proxy processes may remain open.
Step 7: Rotate IPWeb Proxies in Puppeteer
If your workflow needs different IP addresses across sessions, you can rotate proxies by choosing a different proxy before launching each browser instance.
For simple rotation, prepare a list of proxies:
const proxies = [
  {
    server: 'http://gate1.ipweb.cc:7778',
    username: 'username_1',
    password: 'password_1'
  },
  {
    server: 'http://gate2.ipweb.cc:7778',
    username: 'username_2',
    password: 'password_2'
  },
  {
    server: 'http://gate3.ipweb.cc:7778',
    username: 'username_3',
    password: 'password_3'
  }
];

function pickProxy() {
  return proxies[Math.floor(Math.random() * proxies.length)];
}
Then launch Puppeteer with the selected proxy:
const puppeteer = require('puppeteer');

const proxies = [
  {
    server: 'http://gate1.ipweb.cc:7778',
    username: 'username_1',
    password: 'password_1'
  },
  {
    server: 'http://gate2.ipweb.cc:7778',
    username: 'username_2',
    password: 'password_2'
  }
];

function pickProxy() {
  return proxies[Math.floor(Math.random() * proxies.length)];
}

(async () => {
  const proxy = pickProxy();

  const browser = await puppeteer.launch({
    headless: true,
    args: [`--proxy-server=${proxy.server}`]
  });

  const page = await browser.newPage();

  await page.authenticate({
    username: proxy.username,
    password: proxy.password
  });

  await page.goto('https://httpbin.org/ip', {
    waitUntil: 'networkidle2',
    timeout: 60000
  });

  const result = await page.evaluate(() => document.body.innerText);
  console.log(result);

  await browser.close();
})();
For long-running browser workspaces, avoid changing IPs too often. Use a static or long-session proxy when the same workflow needs a stable network route. For public data workflows, regional checks, and short tasks, Dynamic Residential proxies can be more flexible.
Choosing the Right IPWeb Proxy for Puppeteer
The best proxy type depends on what your script is doing. A regional QA script, a public data workflow, and a screenshot monitor do not always need the same proxy setup.
| Puppeteer Use Case | Recommended IPWeb Proxy | Why It Works |
|---|---|---|
| Public web data workflows | Dynamic Residential proxies | Useful when browser sessions need flexible residential IP coverage |
| Long-running browser workspace | >Static Residential proxies or Dynamic Long Session ISP proxies | Keeps the network environment more consistent across sessions |
| Regional testing | Residential proxy from the target country | Allows testing content from a specific location |
| Screenshot monitoring | Stable residential or ISP proxy | Reduces unexpected location changes between runs |
| Continuous browser workflows | >Unlimited Residential proxies | Useful when traffic volume is the main concern |
| SOCKS-based workflows | SOCKS5 proxy | Useful when SOCKS5 compatibility is required |
For stable browser sessions, use Static Residential proxies or long-session proxies. For public data workflows and location testing, Dynamic Residential proxies are often more practical.
Common Puppeteer Proxy Errors and Fixes
Puppeteer proxy problems usually come from wrong proxy syntax, missing authentication, expired proxy sessions, or slow network routes. The table below covers the most common issues.
| Error or Problem | Likely Cause | How to Fix It |
|---|---|---|
ERR_PROXY_CONNECTION_FAILED |
Proxy host or port is wrong, or the proxy is unavailable | Recheck the IPWeb proxy host, port, and session status |
407 Proxy Authentication Required |
Proxy username or password is missing or incorrect | Use page.authenticate() or proxy-chain |
| Navigation timeout | Proxy route is slow, target website is slow, or the page waits too long | Increase timeout, use another proxy, or change target region |
| Local IP still appears | --proxy-server was not applied correctly |
Check the launch argument and verify the protocol prefix |
| SOCKS5 proxy does not work | Wrong protocol or unsupported proxy type | Use socks5://host:port and confirm SOCKS5 is enabled in IPWeb |
| Script works locally but fails on server | Server firewall, hosting network, or DNS issue | Check outbound proxy access and test the proxy from the server |
| Too many request failures | Requests may be too frequent or browser behavior may be inconsistent | Add retries, reduce concurrency, rotate proxies, and review browser timing |
407 Proxy Authentication Required
This error means the proxy server needs authentication. If you only set --proxy-server but do not call page.authenticate(), Puppeteer may fail when the page tries to load.
Use this pattern:
await page.authenticate({
  username: 'your_username',
  password: 'your_password'
});
Local IP Still Appears
If the IP test endpoint still shows your local IP, the proxy argument may not be applied. Check that the proxy server is passed inside puppeteer.launch() and that the value only includes the protocol, host, and port.
Correct:
--proxy-server=http://gate1.ipweb.cc:7778Incorrect:
--proxy-server=gate1.ipweb.cc:7778:username:passwordNavigation Timeout
Some proxy routes are slower than direct local browsing. Increase the timeout and use networkidle2 only when the target page actually becomes idle. If the page loads many background requests, domcontentloaded may be more practical.
await page.goto('https://example.com', {
  waitUntil: 'domcontentloaded',
  timeout: 90000
});
Best Practices for Using IPWeb Proxies with Puppeteer
Keep proxy credentials out of public code repositories. Use environment variables or a secure configuration system when running Puppeteer in production.
Test the proxy IP before running large jobs. A simple IP test request can prevent long browser workflows from running through the wrong IP.
Use one browser instance per proxy when possible. Sharing one proxy across too many parallel pages can slow down the script and may create unstable behavior.
Add retry logic for timeouts and connection errors. Proxy networks are real networks, and occasional failures can happen during long-running jobs.
Choose the proxy type based on the task. Use Dynamic Residential proxies for public data workflows and regional testing. Use stable residential or ISP proxies for long-running browser workspaces and monitoring.
Review your concurrency settings. Even with a strong proxy pool, sending too many requests too quickly can create failures that look like proxy problems but are actually behavior, timing, or rate-limit issues.
Always follow the target website's terms, robots.txt guidance where applicable, and applicable data protection rules when using Puppeteer for public data workflows.
FAQ
Can Puppeteer use proxies?
Yes. Puppeteer can use proxies by passing a proxy server to Chromium through the --proxy-server launch argument. If the proxy requires authentication, use page.authenticate() or a package such as proxy-chain.
How do I use IPWeb proxies in Puppeteer?
Copy the IPWeb proxy host, port, username, and password. Add the host and port to --proxy-server, then pass the username and password through page.authenticate(). Finally, open an IP test endpoint to verify the proxy IP.
Can Puppeteer use SOCKS5 proxies?
Yes. If your IPWeb proxy supports SOCKS5, use the socks5:// protocol in the proxy server argument, such as --proxy-server=socks5://gate1.ipweb.cc:7778. For authenticated SOCKS5 setups, confirm the supported authentication method before using it in production.
Why is my Puppeteer proxy not working?
Common reasons include an incorrect proxy host, wrong port, missing authentication, invalid username or password, protocol mismatch, expired proxy session, or server network restrictions.
How do I rotate proxies in Puppeteer?
Create a list of proxy servers and select one before launching each browser instance. For IPWeb Dynamic Residential proxies, you can also use session settings from your proxy dashboard depending on your plan.
Should I use HTTP or SOCKS5 proxies with Puppeteer?
HTTP proxies are simple and work well for most browser automation tasks. SOCKS5 proxies are useful when SOCKS compatibility is required. The selected protocol must match the proxy generated in IPWeb.
Can I use IPWeb residential proxies for Puppeteer scraping?
Yes. Residential proxies are commonly used for Puppeteer-based public data workflows, regional testing, and browser automation because they provide real-user network routes. For larger workflows, use proper retry logic, conservative request rates, and proxy rotation.
Final Thoughts
Setting up IPWeb proxies in Puppeteer is straightforward once you understand the separation between proxy routing and proxy authentication. Use --proxy-server for the proxy host and port, then use page.authenticate() or proxy-chain for the username and password.
For small tests, one HTTP proxy may be enough. For web scraping, regional testing, or browser automation at scale, choose the right IPWeb proxy type, verify the final IP address, add retry logic, and avoid sending too many requests through a single proxy. A stable Puppeteer proxy setup should be reliable, testable, and easy to maintain.
You can also explore more proxy integration guides to learn how to use IPWeb proxies with other browser tools, automation frameworks, and proxy setup workflows.